Here is a simple way to rip mp3 from flac files. There are few softwares that need to be installed for to work.
Download and Install Sound Converter For Linux. It can be downloaded from here.
Once Installed you can start up the application from the multimedia panel in the start menu.
Install additional packages
#sudo apt-get install flac mp3splt
Step 1: Convert the flac file to mp3 using Sound Converter. This process is quite simple. Start the sound converter and specify the flac file you wish to convert and press "Convert". This converts the flac file to one single mp3 file. But we are aware of multiple songs in that mp3 file.
Step 2: Split the single mp3 files into multiple mp3 tracks. This can be done using the mp3splt utility we just installed.
#mp3splt -f -c Album.cue Album.mp3
Assuming that Album.mp3 is the file produced by the Sound Converter. "cue" files are generally provided with flac files for this very purpose. If you do not have the cue file, you have to use some mp3 splitter to achieve the same.
Step 3: The new mp3 files might have issues with reading mp3 duration of these files. If that happens then a simple tool called vbrfix will fix the problem.
Install vbrfix
#sudo apt-get install vbrfix
To fix a mp3 file using vbrfix
#vbrfix myfile.mp3 myfile_fix.mp3
The myfile_fix.mp3 would have the duration problem fixed.
Friday, December 18, 2009
Thursday, September 17, 2009
Real-Time Linux Kernel Scheduler
My article explaining the Real-Time Linux kernel scheduler is finally available for general reading on the Linux Journal site. You can read it here. Any feedback on the article are most welcome !

Monday, August 3, 2009
Dumping kernel page tables
Sometimes when debugging kernel issues, you might come across kernel addresses that you would find very difficult to map to a particular section in the kernel, ie, vmalloc, vmemmap, low/high kernel mapping, kernel text, etc. On x86, Arjan van de Ven has written an interface that provides a dump of the kernel page tables which gives information on the various memory areas in the kernel.
# cat /debug/kernel_page_tables
---[ User Space ]---
0x0000000000000000-0xffff800000000000 16777088T pgd
---[ Kernel Space ]---
0xffff800000000000-0xffff880000000000 8T pgd
---[ Low Kernel Mapping ]---
0xffff880000000000-0xffff880000200000 2M RW GLB x pte
0xffff880000200000-0xffff880040000000 1022M RW PSE GLB x pmd
0xffff880040000000-0xffff8800cfe00000 2302M RW PSE GLB NX pmd
...
---[ vmalloc() Area ]---
0xffffc20000000000-0xffffc20000001000 4K RW PCD GLB NX pte
0xffffc20000001000-0xffffc20000004000 12K pte
0xffffc20000004000-0xffffc20000005000 4K RW PCD GLB NX pte
0xffffc20000005000-0xffffc20000008000 12K pte
0xffffc20000008000-0xffffc2000000d000 20K RW PCD GLB NX pte
0xffffc2000000d000-0xffffc20000010000 12K pte
0xffffc20000010000-0xffffc20000011000 4K RW PCD GLB NX pte
....
---[ Vmemmap ]---
0xffffe20000000000-0xffffe20007c00000 124M RW PSE GLB NX pmd
0xffffe20007c00000-0xffffe20040000000 900M pmd
0xffffe20040000000-0xffffe28000000000 511G pud
0xffffe28000000000-0xffffff8000000000 29T pgd
0xffffff8000000000-0xffffffff80000000 510G pud
---[ High Kernel Mapping ]---
0xffffffff80000000-0xffffffff80200000 2M pmd
0xffffffff80200000-0xffffffff80a00000 8M RW PSE GLB x pmd
0xffffffff80a00000-0xffffffffa0000000 502M pmd
---[ Modules ]---
0xffffffffa0000000-0xffffffffa000a000 40K RW GLB x pte
0xffffffffa000a000-0xffffffffa000f000 20K pte
0xffffffffa000f000-0xffffffffa0016000 28K RW GLB x pte
0xffffffffa0016000-0xffffffffa001b000 20K pte
....
...
Understanding the above output:
o First field indicates the address range of a particular type of area (for example, user space, vmalloc area, kernel space, etc)
o The second field indicates the size of the address range in K,M,G,T units
o The fields following the size of the range have the following meaning:
USR - whether the page being mapped is a user page or not
RW - whether the page is read/write. If not RW, the output would be 'ro' to indicate a read-only page
PCD - Page Cache Disabled - maps a page with caching disabled
PWT - page with Page Write-Through set
PSE - Extended paging enabled - allows large linear contiguous address ranges to be mapped
GLB - Page Global flag - The global flag is set for a page that is frequently used and prevents it from being flushed from the TLB
NX - Page is non-executable, else marked as 'x'
o The last entry indicates the particular level of the page table - pgd, pud, pmd or pte that the region corresponds to
Enable the CONFIG_X86_PTDUMP configuration option, along with enabling debugfs. The corresponding kernel code for the interface can be found under arch/x86/mm/dump_pagetables.c
Thursday, July 23, 2009
Using gdb for debugging kernel modules
This is a very simple and maybe trivial post.. and nothing novel ! But something that has helped me a lot in debugging issues with my kernel modules and kernel panics in general. So, when you get a panic originating in a kernel module, you normally get it in the following format:
BUG: unable to handle kernel NULL pointer dereference at 0000000000000050
IP: [<ffffffff8023262c>] mmput+0x11/0xb0
PGD 22bcf6067 PUD 211839067 PMD 0
Oops: 0002 [#1] SMP
last sysfs file: /sys/block/sdb/size
CPU 6
Modules linked in: <a routine in my module> ehci_hcd uhci_hcd [last unloaded: <my module>]
Pid: 26830, comm: <my kernel thread> Not tainted 2.6.28-anki #13
RIP: 0010:[<ffffffff8023262c>] [<ffffffff8023262c>] mmput+0x11/0xb0
RSP: 0000:ffff8802279fbed0 EFLAGS: 00010246
RAX: 0000000000000000 RBX: 0000000000000000 RCX: 0000000000000045
RDX: ffff88022e150300 RSI: 0000000000000282 RDI: 0000000000000000
RBP: ffff8802279fbee0 R08: 0000000000000018 R09: ffff88022e150300
R10: ffff88022e150300 R11: 00007fffe6dfefff R12: ffff88022e52f860
R13: ffff88022e150300 R14: ffff88022d99aed0 R15: ffff88022d99b110
FS: 0000000000000000(0000) GS:ffff88022f818280(0000) knlGS:0000000000000000
CS: 0010 DS: 0018 ES: 0018 CR0: 000000008005003b
CR2: 0000000000000050 CR3: 0000000211829000 CR4: 00000000000006e0
DR0: 0000000000000000 DR1: 0000000000000000 DR2: 0000000000000000
DR3: 0000000000000000 DR6: 00000000ffff0ff0 DR7: 0000000000000400
Process memref (pid: 26830, threadinfo ffff8802279fa000, task
ffff88022d4ef1b0)
Stack:
ffff88022e150300 0000000000000000 ffff8802279fbf20 ffffffffa003314b
ffff8802279fbf20 ffff88022d99aed0 ffffffffa00330f2 ffff880210cf1c68
ffff88022f855ee0 ffff88022f855f00 ffff8802279fbf40 ffffffff802468e3
Call Trace:
[<ffffffffa003314b>] <routine in my module>+0x59/0xb2 [<my kernel thread>]
[<ffffffffa00330f2>] ? <my modulee>+0x0/0xb2 [<my kernel thread>]
[<ffffffff802468e3>] kthread+0x49/0x76
[<ffffffff8020cce9>] child_rip+0xa/0x11
[<ffffffff802277a5>] ? dequeue_task+0xbf/0xca
[<ffffffff8024689a>] ? kthread+0x0/0x76
[<ffffffff8020ccdf>] ? child_rip+0x0/0x11
Code: df e8 88 c7 fd ff 48 8b 3d ba 28 6b 00 48 89 de e8 b1 af 05 00 41 59 5b
c9 c3 55 48 89 e5 53 48 89 fb 48 83 ec 08 e8 6a fa 39 00 <f0> ff 4b 50 0f 94
c0 84 c0 0f 84 8b 00 00 00 48 89 df e8 8b 76
RIP [<ffffffff8023262c>] mmput+0x11/0xb0
RSP <ffff8802279fbed0>
CR2: 0000000000000050
Now, to find out from where exactly in my module the panic happened, I simply use gdb, as below:
#gdb <path to my module.o file from the kernel source root dir> [for example, #gdb drivers/misc/ankita.o]
....
(gdb) list *(the routine)+0x59
The above gives a source listing, pointing to the lines which correspond to 0x59 address. This serves as a good starting point to debug the issue. Hope this helps some folks atleast :-)
Thursday, July 16, 2009
Looking at thread state inside gdb
While helping a friend debug a multi-threaded application hang on linux, using gdb. She was facing difficulty in pointing out exactly which were the threads that were in blocked state. Getting thread info only tells us what the thread ids are and the routine they are executing.
(gdb) info threads
12 Thread 4398053392560 (LWP 7234) 0x0000000010005740 in xxxx ()
11 Thread 4398054441136 (LWP 7235) 0x0000000010005740 in xxxx ()
10 Thread 4398055489712 (LWP 7237) 0x0000000010005748 in xxxx ()
9 Thread 4398063878320 (LWP 8263) 0x0000000010000768 in yyy ()
8 Thread 4398062829744 (LWP 8267) 0x0000000010003624 in zzz ()
7 Thread 4398061781168 (LWP 8270) 0x0000000010003624 in zzz ()
6 Thread 4398060732592 (LWP 8273) 0x0000000010001ce4 in ddd ()
5 Thread 4398059684016 (LWP 8276) 0x0000000010000750 in fff ()
4 Thread 4398058635440 (LWP 8277) 0x000000001001e128 in ttt ()
3 Thread 4398057586864 (LWP 8278) 0x0000000010003624 in zzz ()
2 Thread 4398056538288 (LWP 8281) 0x000000001001e140 in rrrr ()
1 Thread 269578240 (LWP 28151) 0x000000001000cba4 in www ()
She complained that in another proprietary debugger she has worked with in the past, she could easily also get the thread status information as well. Found that on gdb, we need to use the following commands to get the status information of the threads:
(gdb) help info proc
Show /proc process information about any running process.
Specify any process id, or use the program being debugged by default.
Specify any of the following keywords for detailed info:
mappings -- list of mapped memory regions.
stat -- list a bunch of random process info.
status -- list a different bunch of random process info.
all -- list all available /proc info.
(gdb) info proc 7234 stat
process 7234
cmdline = '/usr/bin/xyz'
warning: unable to read link '/proc/7234/cwd'
warning: unable to read link '/proc/7234/exe'
Process: 7234
Exec file: xyz
State: S
Parent process: 3230
Process group: 7234
Session id: 7234
TTY: 0
TTY owner process group: -1
Flags: 0x402040
Minor faults (no memory page): 96
Minor faults, children: 0
Major faults (memory page faults): 0
Major faults, children: 0
utime: 0
stime: 0
utime, children: 0
stime, children: 0
jiffies remaining in current time slice: 20
'nice' value: 0
jiffies until next timeout: 1
jiffies until next SIGALRM: 0
start time (jiffies since system boot): 4371
Virtual memory size: ...
Resident set size: ....
rlim: ......
Start of text: 0xb8013000
End of text: 0xb8025ca4
Start of stack: 0xbf925630
(gdb) info proc 7234 status
process 7234
cmdline = '/usr/bin/xyz'
warning: unable to read link '/proc/7234/cwd'
warning: unable to read link '/proc/7234/exe'
Name: xyz
State: S (sleeping)
Tgid: 7234
Pid: 7234
PPid: 3230
TracerPid: 0
Uid: 1000 1000 1000 1000
Gid: 1000 1000 109 1000
FDSize: 32
Groups: 4 20 24 46 106 117 118 123 124 1000
VmPeak: 4784 kB
VmSize: 4784 kB
VmLck: 0 kB
VmHWM: 636 kB
VmRSS: 636 kB
VmData: 380 kB
VmStk: 84 kB
VmExe: 76 kB
VmLib: 4020 kB
VmPTE: 20 kB
Threads: 1
SigQ: 0/16382
SigPnd: 0000000000000000
ShdPnd: 0000000000000000
SigBlk: 0000000000000000
SigIgn: 0000000000001002
SigCgt: 0000000180004001
CapInh: 0000000000000000
CapPrm: 0000000000000000
CapEff: 0000000000000000
CapBnd: ffffffffffffffff
Cpus_allowed: 00000000,00000003
Cpus_allowed_list: 0-1
Mems_allowed: 1
Mems_allowed_list: 0
voluntary_ctxt_switches: 627
nonvoluntary_ctxt_switches: 0
So as we can see, we can get a whole lot of information about the threads and not just the state. There are other options supported by the info proc command as shown by the help. gdb picks up the above information from the /proc/<pid> interface. It helps to be able to look at all the pieces of debug information from the same interface itself.
Friday, July 3, 2009
Fake NUMA nodes in Linux
While NUMA systems are becoming commonplace, many a times we do not have access to such systems when either writng new code, understanding NUMA architecture, conducting experiments or debugging existing code. For such cases, the Linux kernel provides a very neat feature called 'fake numa nodes'. One can create fake numa nodes on a non-NUMA machine by simply passing a commandline parameter to the kernel. Below are the steps for x86 systems:
You can play around with more options :) The userspace numa utilities like numactl and numastat would then show the numa environment that has been setup. Details of the cpumap and per-node meminfo can be obtained from the sysfs file /sys/devices/system/node/node<0|1|2..>.
Fake NUMA has one flaw however and that is the CPU mapping to nodes. There would exist nodes that do not show up as having any CPUs (unde the cpumap file in the node dir of the above mentioned sysfs file). As per the semantics, a CPU must unquely belong to a NUMA node. However, inside the kernel, the CPU is mapped to all the fake nodes.
Fake NUMA nodes can be created even on a real NUMA system. In this case, the fake nodes are aligned within a real node. The distances between two fake nodes across two real nodes is maintained. Could cover internal implementation details in a separate post. Have fun playing around with NUMA !
- Following config options need to be turned on: CONFIG_NUMA=y, CONFIG_NUMA_EMULATION=y
- Build the kernel with the above config options set
- The kernel commandline could be any one of the following, depending on your requirement:
- numa=fake=4 : Split the entire memory into 4 equal nodes
- numa=fake=8*1024 : Split the memory into 8 equal chunks of 1024MB (ie 1G) (note, the number is considered to be in MB) [If system has more memory, the last node will be assigned remaining memory]
- numa=fake=2*512,2*1024 : Split the memory into 2 nodes of 512MB each and 2 more nodes of 1GB each (and so on)
You can play around with more options :) The userspace numa utilities like numactl and numastat would then show the numa environment that has been setup. Details of the cpumap and per-node meminfo can be obtained from the sysfs file /sys/devices/system/node/node<0|1|2..>.
Fake NUMA has one flaw however and that is the CPU mapping to nodes. There would exist nodes that do not show up as having any CPUs (unde the cpumap file in the node dir of the above mentioned sysfs file). As per the semantics, a CPU must unquely belong to a NUMA node. However, inside the kernel, the CPU is mapped to all the fake nodes.
Fake NUMA nodes can be created even on a real NUMA system. In this case, the fake nodes are aligned within a real node. The distances between two fake nodes across two real nodes is maintained. Could cover internal implementation details in a separate post. Have fun playing around with NUMA !
Sunday, June 28, 2009
Build your kernel faster
Normally when building custom kernels for our laptops or desktops, we tend to make use of the kernel config file used by the particular distro. However the distro config files tend to be huge, having loads of modules turned on, ven those which might not even be needed on our particular laptop or desktop. This is the case since the distro kernels need to cater to a large configurations of systems. . This leads to the kernel taking ages to compile ! If you want to build your kernel fast, and turn off all those modules/drivers which are not needed on your system, streamline_config.pl script by Steven Rostedt is what you need (at the sametime ensuring that your kernel does have all that is necessary). Here is the thread where Steven explains how this script can be used. In brief,
Run the script with the arguement being your architecture's Kconfig file and save the output
Note: If you already have a .config file that has some of your custom config options set and you want to streamline that, no worries as streamline_config.pl will work on that .config itself (provided its present in the kernel src dir). You might still want to take a backup of your .config [;-)]
Run the script with the arguement being your architecture's Kconfig file and save the output
- # ./streamline_config.pl arch/x86/Kconfig > config_stream
Note: If you already have a .config file that has some of your custom config options set and you want to streamline that, no worries as streamline_config.pl will work on that .config itself (provided its present in the kernel src dir). You might still want to take a backup of your .config [;-)]
Sunday, June 21, 2009
Using large pages
Linux has had support for large pages (also called huge pages) for a long time now. The size of large pages supported depends on the platform. For example, on Intel it has mostly been 2MB. Large pages offer the advantage of having fewer entries in the TLB and thus fewer cache misses. However, it could lead to more wastage of memory and fragmentation. Many applications typically use large pages for certain designation functions. For example, if supported and required number available, JVM heap is composed of large pages.
An application can request large pages using the shmget API:
An application can request large pages using the shmget API:
#include <sys/ipc.h>
#include <sys/shm.h>
int shmget(key_t key, size_t size, int shmflg);
The SHM_HUGETLB flag part of shmflg field specifies creation of large pages.
Linux kernel provides an interface using which large pages can be requested.
#echo 1000 > /proc/sys/vm/nr_hugepages
The above causes 1000 large pages to be allocated by the kernel. More information on large pages can be obtained from the /proc fs:
#cat /proc/meminfo
MemTotal: 8114308 kB
MemFree: 5867312 kB
Buffers: 8412 kB
Cached: 107304 kB
SwapCached: 0 kB
Active: 48000 kB
Inactive: 87592 kB
Active(anon): 22704 kB
Inactive(anon): 0 kB
Active(file): 25296 kB
Inactive(file): 87592 kB
Unevictable: 0 kB
Mlocked: 0 kB
SwapTotal: 4883752 kB
SwapFree: 4883752 kB
Dirty: 48 kB
Writeback: 36 kB
AnonPages: 20212 kB
Mapped: 10948 kB
Slab: 25988 kB
SReclaimable: 12916 kB
SUnreclaim: 13072 kB
PageTables: 2400 kB
NFS_Unstable: 0 kB
Bounce: 0 kB
WritebackTmp: 0 kB
CommitLimit: 7916904 kB
Committed_AS: 46040 kB
VmallocTotal: 34359738367 kB
VmallocUsed: 43496 kB
VmallocChunk: 34359693843 kB
HugePages_Total: 1000
HugePages_Free: 1000
HugePages_Rsvd: 0
HugePages_Surp: 0
Hugepagesize: 2048 kB
DirectMap4k: 3824 kB
DirectMap2M: 8384512 kB
On a NUMA system, the kernel splits large page allocations equally across the different nodes. For example, if the system has 2 nodes, a request of 1000 large pages would get split into 500 pages from each node. Per node large page information can be obtained from the /sys interface:
# cat /sys/devices/system/node/node0/meminfo
Node 1 MemTotal: 4194304 kB
Node 1 MemFree: 40004 kB
Node 1 MemUsed: 4154300 kB
Node 1 Active: 2166524 kB
Node 1 Inactive: 810704 kB
Node 1 Active(anon): 2127084 kB
Node 1 Inactive(anon): 8360 kB
Node 1 Active(file): 39440 kB
Node 1 Inactive(file): 802344 kB
Node 1 Unevictable: 0 kB
Node 1 Mlocked: 0 kB
Node 1 Dirty: 0 kB
Node 1 Writeback: 0 kB
Node 1 FilePages: 841792 kB
Node 1 Mapped: 11008 kB
Node 1 AnonPages: 2135884 kB
Node 1 PageTables: 5136 kB
Node 1 NFS_Unstable: 0 kB
Node 1 Bounce: 0 kB
Node 1 WritebackTmp: 0 kB
Node 1 Slab: 33704 kB
Node 1 SReclaimable: 30708 kB
Node 1 SUnreclaim: 2996 kB
Node 1 HugePages_Total: 500
Node 1 HugePages_Free: 498
Node 1 HugePages_Surp: 0
Recently, in one of the benchmarks (JAVA benchmark) I was running, I was seeing a huge performance degradation of about 6-8%. After some debugging, the issue turned out to be that the application was not able to utilize the large pages allocated (thanks to some weird environment I had ;-) ). To find out the number of large pages being utilized by the app, besides the above meminfo output, you can also use numa_maps. For example,
# cat /proc/<process pid>/numa_maps
00001000 default anon=1 dirty=1 N0=1
00400000 default file=<....library file info..> mapped=10 mapmax=3 N0=10
0050b000 default file=<....library file info..> anon=1 dirty=1 N0=1
0050c000 default heap anon=213 dirty=213 N0=213
00600000 default file=/SYSV00000000\040(deleted) huge dirty=472 N0=472
40600000 default
40601000 default anon=2 dirty=2 N0=2
40641000 default
40642000 default anon=4 dirty=4 N0=4
40682000 default
40683000 default anon=2 dirty=2 N0=2
4090f000 default
40910000 default anon=3 dirty=3 N0=3
40a68000 default
40a69000 default anon=4 dirty=4 N0=4
40a70000 default
40a71000 default anon=2 dirty=2 N0=2
40ab1000 default
40ab2000 default anon=2 dirty=2 N0=2
.....
41fc9000 default anon=10 dirty=10 N0=10
427c9000 default anon=535 dirty=535 N0=535
2aaaaac00000 default file=/SYSV00000000\040(deleted) huge dirty=1 N0=1
7f6024000000 default anon=5578 dirty=5578 N0=5578
7f6027398000 default
7f602a402000 default anon=821 dirty=821 N0=821
Friday, June 19, 2009
Useful staps to track task movement across CPUs
Quite sometime back, I was faced with a situation where I needed to track instances when a particular task was being migrated away from a cpu. It was in the context of a real-time system, where a real-time task was facing huge context switch delays. Obvious suspect being the scheduler, I used systemtap to infer a few things, besides other debugging:
* Author: Ankita Garg <ankita@in.ibm.com>
* Description: Captures information on the migration of threads
*
* This program is free software; you can redistribute it and/or modify
* it under the terms of the GNU General Public License as published by
* the Free Software Foundation; either version 2 of the License, or
* (at your option) any later version.
*
* This program is distributed in the hope that it will be useful,
* but WITHOUT ANY WARRANTY; without even the implied warranty of
* MERCHANTABILITY or FITNESS FOR A PARTICULAR PURPOSE. See the
* GNU General Public License for more details.
*
* © Copyright IBM Corp. 2009. All Rights Reserved.
*
*/
probe kernel.function("__migrate_task")
{
if(($1 != 0 ) && (tid() == $1)) {
printf ("thread %d (%s) is migrating from %d to %d \n", $p->pid,
kernel_string($p->comm), $src_cpu, $dest_cpu);
}
}
* Author: Ankita Garg <ankita@in.ibm.com>
* Description: Captures information on the number of times java thread
* switches cpu
*
* This program is free software; you can redistribute it and/or modify
* it under the terms of the GNU General Public License as published by
* the Free Software Foundation; either version 2 of the License, or
* (at your option) any later version.
*
* This program is distributed in the hope that it will be useful,
* but WITHOUT ANY WARRANTY; without even the implied warranty of
* MERCHANTABILITY or FITNESS FOR A PARTICULAR PURPOSE. See the
* GNU General Public License for more details.
*
* © Copyright IBM Corp. 2009. All Rights Reserved.
*
*/
global threads
probe kernel.function("finish_task_switch")
{
if ((threads[tid()] != cpu()) && (tid() != 0) && (execname() == @1)) {
printf("thread %d (%s) context switched on %d \n",
tid(), execname(), cpu());
printf("state: %d\n", task_state(task_current()))
print_stack(backtrace())
}
threads[tid()] = cpu();
}
These are a bit older techniques, as now there is a new tracepoints infrastructure which can do these things. But on older kernels, the above would be useful. Expect more posts on kernel RAS features in due time.
- To find if the task was being migrated away to some other cpu, used the following trivial stap script:
* Author: Ankita Garg <ankita@in.ibm.com>
* Description: Captures information on the migration of threads
*
* This program is free software; you can redistribute it and/or modify
* it under the terms of the GNU General Public License as published by
* the Free Software Foundation; either version 2 of the License, or
* (at your option) any later version.
*
* This program is distributed in the hope that it will be useful,
* but WITHOUT ANY WARRANTY; without even the implied warranty of
* MERCHANTABILITY or FITNESS FOR A PARTICULAR PURPOSE. See the
* GNU General Public License for more details.
*
* © Copyright IBM Corp. 2009. All Rights Reserved.
*
*/
probe kernel.function("__migrate_task")
{
if(($1 != 0 ) && (tid() == $1)) {
printf ("thread %d (%s) is migrating from %d to %d \n", $p->pid,
kernel_string($p->comm), $src_cpu, $dest_cpu);
}
}
- Below is a script that tracks all the cpus that a particular task ran on. Pl note it does not track the context switches.
* Author: Ankita Garg <ankita@in.ibm.com>
* Description: Captures information on the number of times java thread
* switches cpu
*
* This program is free software; you can redistribute it and/or modify
* it under the terms of the GNU General Public License as published by
* the Free Software Foundation; either version 2 of the License, or
* (at your option) any later version.
*
* This program is distributed in the hope that it will be useful,
* but WITHOUT ANY WARRANTY; without even the implied warranty of
* MERCHANTABILITY or FITNESS FOR A PARTICULAR PURPOSE. See the
* GNU General Public License for more details.
*
* © Copyright IBM Corp. 2009. All Rights Reserved.
*
*/
global threads
probe kernel.function("finish_task_switch")
{
if ((threads[tid()] != cpu()) && (tid() != 0) && (execname() == @1)) {
printf("thread %d (%s) context switched on %d \n",
tid(), execname(), cpu());
printf("state: %d\n", task_state(task_current()))
print_stack(backtrace())
}
threads[tid()] = cpu();
}
These are a bit older techniques, as now there is a new tracepoints infrastructure which can do these things. But on older kernels, the above would be useful. Expect more posts on kernel RAS features in due time.
Thursday, June 18, 2009
Importing .ics into Lotus Notes 8
A number of times I get calender invites for meetings on my non-Lotus notes email IDs. The calender invites are normally in the .ics format. Once can easily import it into Lotus Notes. Here is how:
- Compose a mail inside notes
- Attach the .ics file to it
- Right click the attachment, and click on "View"
- The calender view would open, with the meeting details. Now accept/decline the invite, save and exit
Free up that memory
Recently came across this cool interface in the Linux kernel. Typically, the memory might be over-provisioned on the system. Instead of wasting the memory, the kernel normally utilizes a lot of it for page cache, dentry cache and inodes. These caches speed I/O operations and improves performance. However, there are cases when large amount of memory might actually be needed by the apps. While most of the cache pages could be easily reclaimed, there is obviously some overhead involved (the pages could be dirty and might have to written back to the disk, thus incurring disk write latency). Linux has a neat kernel.. so now, while it uses its smart to utilize the memory well, it also provides a method for people to indicate that they do not want the kernel to use its smarts ;-)
To free memory, just do the following:
# echo 1 > /proc/sys/vm/drop_caches
(the above frees only page cache)
# echo 2 > /proc/sys/vm/drop_caches
(for freeing dentry caches and inodes)
# echo 3 > /proc/sys/vm/drop_caches
(for freeing all of the above)
It would be advisable to first do a 'sync' before dropping the caches, so that all the dirty pages could be acted upon.
Saturday, May 30, 2009
Simplifying GCC
GCC is the GNU Compiler Collection which provides C, C++ etc compilers. These compilers are used by default in all *nixes .
Here i provide simple command line options which can prove to be quite useful.
Here i provide simple command line options which can prove to be quite useful.
- The simplest way to use GCC to compile a C source file is
$ gcc -o test test1.c test2.c
gcc is the C compiler, test1.c and test2.c are the input C source files and -o lets us specify the name of the output file. Here it is "test". Without the -o option, "a.out" is the default executable that gets created. - The preprocessor:
$ gcc -E test.c > test.out
This option, ensures the compilation process stops after the pre-processor has run. This helps us in figuring out issues/problems in macros. - The Compiler:
$ gcc -c test.c -o test.o
This option ensures the compilation process completes but doesn't invoke the linker/loader. This is useful if you want to just remove compilation warnings and errors. - Header Files:
$gcc -c test.c -I /location/of/header/files -o test
Many a times the headers files you want to use, is located is some other directory. A "bad" practice followed is to include the direct path of the header files in the C src file.
Instead use this option. It tells the compiler which directories to look in for the mentioned header files. The -I options can be used multiple times for multiple directories where header files are located. - Library Files:
$ gcc -c test.c -lpthread -L /usr/lib/libpthread
Another requirement that is frequently required is using standard libraries ( NPTL Threads etc) or non-standard ones (expat etc). '-l' option tells which library to use while linking while '-L' tells where the find this library. In the above example during linking, it will search for pthread library in the dir /usr/lib/libpthread. - Warnings, Errors, etc:
$gcc test.c -o test -Wall -Werror
-Wall options shows all warnings that are typically not shown during regular compilation. These errors are easy fixable like "Unused varniables", "implicit function declaration" etc. -Werror options tells the compiler to treat all warnings as errors and stop compilation instantly.
Sometimes -Werror can be too strict for our purpose. Instead you can treat only certain warnings are errors.
eg. -Werror-implicit-function-declaration: Treat only implicit function declaration warnings as errors. For more such options check the gcc man pages. - Debugging:
$gcc -g test.c -o test
This option activates all the debugging symbols. This is required if one plans to use gdb for debugging (which is mostly the case). - Optimizations:
$gcc -O2 test.c -o test
This option lets the compiler optimize the code . -O can take 0,1,2 levels of optimizations.
More info is available in the man pages of gcc.
Tuesday, May 19, 2009
Fix Thinkpad Function Keys/Hot Keys in kde 4.2 (Jaunty) - patch to display brightness levels.
A small patch for the script to display the brightness level of your Thinkpad display with the brightness Increase/Decrease keys.
--- softkeys.py 2009-05-08 11:51:28.000000000 +0530
+++ softkeys-0.1.py 2009-05-19 12:43:58.000000000 +0530
@@ -1,6 +1,7 @@
#!/usr/bin/env python
# -*- coding: utf-8 -*-
# Copyright: 2009 by Tillmann Falck <tillmann _at_ falcken _dot_ de>
+# Uttaran Dutta added the funtion for the display for the brightness for T60p <linux-hacks.blogspot.com>
# License: GPL v2 or later
from Xlib.display import Display
@@ -16,8 +17,11 @@
XF86Battery = 244
XF86Display = 235
KeyUndock = 202
+XF86MonBrightnessDown = 232
+XF86MonBrightnessUp = 233
-keys = [XF86Sleep, XF86Standby, XF86Screensaver, XF86Battery, XF86Display, KeyUndock]
+
+keys = [XF86Sleep, XF86Standby, XF86Screensaver, XF86Battery, XF86Display, KeyUndock, XF86MonBrightnessDown, XF86MonBrightnessUp]
def callDisplay():
try:
@@ -63,6 +67,14 @@
print >>sys.stderr, 'Error while trying to change output, try full auto'
os.system('xrandr --auto')
+def briStats(bus):
+ bri = bus.get_object( \
+ 'org.freedesktop.Hal', \
+ '/org/freedesktop/Hal/devices/computer_backlight')
+ briLevel = (bri.GetBrightness(dbus_interface='org.freedesktop.Hal.Device.LaptopPanel')*100)/(bri.GetProperty('laptop_panel.num_levels', dbus_interface='org.freedesktop.Hal.Device')-1)
+ s = 'Brightness level is %d%% <br />' % (briLevel)
+ return s
+
def acStats(bus):
ac = bus.get_object( \
'org.freedesktop.Hal', \
@@ -91,6 +103,26 @@
s = 'Battery %d level %d%%<br />' % (n+1, batLevel)
return s
+def callBrightness():
+ try:
+ sessBus = dbus.SessionBus()
+ sysBus = dbus.SystemBus()
+
+ hal = dbus.Interface( \
+ sysBus.get_object('org.freedesktop.Hal', \
+ '/org/freedesktop/Hal/Manager'), \
+ dbus_interface='org.freedesktop.Hal.Manager')
+
+ s = briStats(sysBus)
+ ea = dbus.Array([], 's')
+ notify = sessBus.get_object('org.kde.VisualNotifications', '/VisualNotifications')
+ notify.Notify('brightness information',0,'brightness information','','Brightness Information', \
+ s,ea,ea,5000, \
+ dbus_interface='org.kde.VisualNotifications')
+ except:
+ print >>sys.stderr, 'No notifications or no information'
+
+
def callBattery():
try:
sessBus = dbus.SessionBus()
@@ -101,6 +133,7 @@
'/org/freedesktop/Hal/Manager'), \
dbus_interface='org.freedesktop.Hal.Manager')
+ briStats(sysBus)
if hal.DeviceExists('/org/freedesktop/Hal/devices/computer_power_supply_ac_adapter_AC'):
ac = acStats(sysBus)
else:
@@ -197,6 +230,8 @@
callSuspend()
elif event.detail == KeyUndock:
callUndock()
+ elif event.detail == XF86MonBrightnessUp or event.detail == XF86MonBrightnessDown:
+ callBrightness()
else:
print >>sys.stderr, "Key %d not handeled" % event.detail
Note- The patch just enables the display changing for display brightness should be already working through acpi.
Friday, May 8, 2009
Fix Thinkpad Function Keys/Hot Keys in kde 4.2 (Jaunty)
Function keys doent work by default in kde 4.2. Those who migrate from gnome to kde 4 find it difficult to adjust without the 'fn' keys. The problem is with powerdevil. The new applet does not have options to configure the acpi events. This will exits till powerdevil is fixed. As of now, we can use a python script to handle these events. Make sure python-2.6, python-dbus and python-xlib are installed in your system. Download the script from here or here.
Give exe permission
#chmod +x softkeys.py
Place the script in ~/.kde/Autostart/ and restart your system. The function keys must start working now.
Give exe permission
#chmod +x softkeys.py
Place the script in ~/.kde/Autostart/ and restart your system. The function keys must start working now.
Thursday, April 30, 2009
Create Desktop Shortcuts Using Cmd Line On KDE 4.2
Here is a quick way to create desktop shortcuts for kde 4.2.
/usr/share/applications/ and /usr/share/applications/kde4 contains all the shortcut files (*.desktop).
Just copy what ever you want to ~/Desktop. Thats it!
/usr/share/applications/ and /usr/share/applications/kde4 contains all the shortcut files (*.desktop).
Just copy what ever you want to ~/Desktop. Thats it!
Tuesday, April 28, 2009
fsck.ext3 Unable to resolve UUID error
I installed Kubuntu 9.04 recently and within a day i ran into a peculiar problem. When i boot my system an error message "fsck.ext3 Unable to resolve UUID=". This error generally happens when there is some information mismatch between what is specified in /etc/fstab and what information the OS gives to fsck utility. In this case, its quite easy to solve the problem.
Enter the root password to enter the Maintenance mode when asked during boot.
(Control - D to continue):
List the partition table of your system.
#fdisk -l
Device Boot Start End Blocks Id System
/dev/sda1 * 1 1913 15361888+ 83 Linux
Partition 1 does not end on cylinder boundary.
/dev/sda2 1914 3186 10225372+ 83 Linux
/dev/sda3 3187 12161 72091687+ 5 Extended
/dev/sda5 3187 9265 48829536 83 Linux
/dev/sda6 9266 11697 19535008+ 83 Linux
/dev/sda7 11698 12161 3727048+ 82 Linux swap / Solaris
#vim /etc/fstab
Verify that each device entry specified in the file matches the correct file-system.This error can occur if FS type is wrongly specified. For example, /dev/sda7 is shown as ext3 FS when it clearly a swap in the above case. Correct such errors and reboot. This should solve the problem.
If the entries are correct then, possible problem lies in the UUID specified in fstab. To solve this problem
Determine the UUID of each and every device mentioned in fstab. This exmaple shows for sda1. Repeat this for all devices.
#vol_id -u /dev/sda1
b056f084-eb83-4374-9635-0b5904ff520a
A line taken from my fstab
# /virt was on /dev/sda1 during installation
UUID=b056f084-eb83-4374-9635-0b5904ff520a /virt ext3 relatime 02
Note that UUID matches the entry in fstab. If there is a mismatch, then the entry shown by fstab must be replaced by vol_id. Thats it! save and reboot. This will solve the problem.
REASON: The problem was solved but i was not sure what caused this problem. On further analysis i was able to narrow down on what caused the issue. Apparently, i did a format of a partition (/dev/sda1) which is NOT the / partition using gpartd. Gpart does not allow formats on mounted partitions, so the tools unmounts the partition and formats it. During this step, udev recognizes the new formated device as a new device and old one being removed(formated). Hence it assigned a new UUID which is now not same the one specified in /etc/fstab. Thats why on reboot i ran into this issue.
Change/Resassign Interface Name In Linux
Depending on the linux distro, the interface name given to network cards differ.
For example, on one distro Intel Giga bit Ethernet card might be detected as eth0 and Broadcom card as eth1 while with another distro this might be reversed. This causes a lot of problem, when one uses automated scripts which hardcode "eth0" and "eth1". In older distros it was matter of changing few network scripts to get this working. One can also use "ip" command to make this change temporarily. But to make it permanent it needs to be changed in udev. Here is how simple it is to change the ethernet names.
NOTE: This is only tested on F-10 and Ubuntu 9.04. Its expected to be the same for other distros. Only the name of the udev script might change.
Edit the rule script:
#vim /etc /udev/rules.d/70-persistent-net.rules
Here the list of n/w adapters and their names are specified!
Change the field NAME="eth0" to NAME="eth1" or vice versa
Remember to rename the other adapter whose name you have borrowed.
Restart the system and you will find the new names interchanged!
Friday, March 13, 2009
Sametime on Koepete
Last year cheezo had blogged about getting pidgin to support sametime protocol. It was great, but as KDE guy i missed it on Kopete. Its only recently i got myself to try it & viola it worked with just a little effort. I have the latest versions of these packages on my KDE 4.2.1 intrepid box (yes i live the bleeding edge tech, but any version of KDE 4.1.x which supports kdenetwork - 4:4.1.80-0ubuntu1 should do the job).
- kopete 4:4.2.1-0ubuntu1~intrepid1
- libmeanwhile1 1.0.2-3+ocdc3+intrepid (I got it from ocdc repo, libmeanwhile is also there in ubuntu multiverse)
- kopete-meanwhile 0.1-0ubuntu2, (optional, can be downloaded from here.)
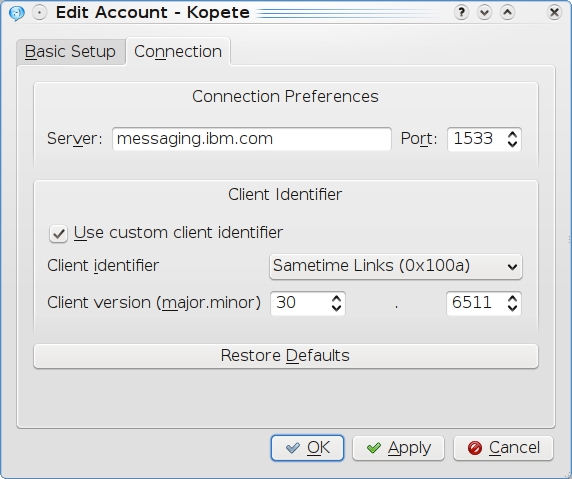
With the above all installed you should see the "Meanwhile" as one of the options in the _messaging services_ list in Kopete. Add a new account & continue with the username & password in the pretty straightforward _Basic Setup_ tab. The only tweaking required was the "Client Identifier" info in the _Connections_ tab. Use the option & no.s in the shot below.
With that you should be good to go.
--
Enjoy
- kopete 4:4.2.1-0ubuntu1~intrepid1
- libmeanwhile1 1.0.2-3+ocdc3+intrepid (I got it from ocdc repo, libmeanwhile is also there in ubuntu multiverse)
- kopete-meanwhile 0.1-0ubuntu2, (optional, can be downloaded from here.)
With the above all installed you should see the "Meanwhile" as one of the options in the _messaging services_ list in Kopete. Add a new account & continue with the username & password in the pretty straightforward _Basic Setup_ tab. The only tweaking required was the "Client Identifier" info in the _Connections_ tab. Use the option & no.s in the shot below.
With that you should be good to go.
--
Enjoy
Tuesday, February 24, 2009
Why linux keeps connected routes when link goes down?
I came across this interesting discussion on a particular behavior of linux. This issues was brought up by a system administrator who was facing an interesting situation. When the link of an interface goes down possibly due to hardware failure or cable pull out, the ip address and routes associated with that interface is retained until someone explicitly deletes it. This behavior is built into linux for more than 10 years and the reason for this was stated by David Miller.
The default behavior for a general purpose operating system isIt becomes clear why the developers decided to go with associating ip address with a particular node rather than an interface in the node. The problem with this implementation is relevant when linux is being used as a router. A router is a multi-homed host and tends to have multiple interfaces each connected to different network. So if a situation arises where the router finds a route entry to send a particular packet there are chances that the link may be down and packet never reaches the destination. Even if there are alternated routes to reach the particular destination it cannot be used as there is already an existing valid route with a interface that is down. Lennart Sorensen argued against David Miller's claim that different interface of the router might be connected to same network in which case the alternate interface can be taken. According to Lennart it still useless as we would end up having 2 route entries to the same destination with different interfaces and would pose the same problem when the first route entry points to an interface which is down. The no conclusion to this little problem as David points out in his replay to Lennart.
to increase the likelyhood of successful communication.
And the way to maximize successful communication is to associate
addresses with the host rather than the interface.
This decision was made at least 10 years ago, and if you think what weAll is not lost in this regard for people using linux as router. Stephen Hemminger suggested using quagga for this purpose. There are patches submitted to the quagga mailing list which does what Lennart wants without any modification to the kernel behaviour. Unfortunately those patches are not yet upstream in the quagga branch and has to be applied as patch. So in future would quagga become the routing management daemon for linux? Thats something we need to watch out.
have now is broken just imagine how much struff would explode if we
changed things.
Tuesday, February 3, 2009
Theory Behind Hiding Zipped File Under Jpg Image
The post Hiding Zipped File Under Jpg Image showed the steps to achieve data hiding in jpg. Since Ego was questioning the theory behind this, i decided to get my hands dirty and find the answer. To understand this, we need to understand the data structures of jpg image and zip files.
Lets bisect the jpg image first.
Jpg Header Format:
The bold words in the above header is of importance to us. The 4 byte value consisting of SOI and JFIF marker. This signifies the starting of the jpg image. Any standard image viewer searches the file for "d8ff e0ff" (little endian mode) pattern. Once this of found, marks the start of the jpg image. The end of the jpg image is marked with "0xd9ff" (little endian mode). A cat on the image is going to make sure that some data is written after 0xd9ff there by making it unnecessary for any image viewer to bother about data after 0xd9ff.
Lets look at the zip header format.
Overall .ZIP file format:
The one that concerns us is local file header
As seen in the bold letters is the signature of the start of the zip file. So the unzip program tries to find the above pattern in the file and assumes that the rest of the file till "end of central dir record" is reached. This explains why tar.gz or tar.bz2 files don't work while zip does. In other words, the gz/bz2 formats look for starting 4 bytes as identifiers and if not found will quit immediately.
The following example will illustrate the file layout of the various file formats.
Example: Generated using hexdump
Image file (jpg):
As discussed, the hex value in bold indicates the start of the jpg file. Now lets look at the zip file.
Zip file (.zip):
After the concatenation, the file now consists of both jpg and zip content as shown below.
Embedded Image File (jpg):
This little example must be able to clear out the doubts of how this works. Next step would be to manipulate the hex file to make zip program believe that jpg data is the zipped data. Stay tuned for more on this.
Lets bisect the jpg image first.
Jpg Header Format:
Start of Image (SOI) marker -- two bytes (FFD8)
JFIF marker (FFE0)

  * length -- two bytes
  * identifier -- five bytes: 4A, 46, 49, 46, 00 (the ASCII code equivalent of a zero terminated "JFIF" string)
  * version -- two bytes: often 01, 02
        o the most significant byte is used for major revisions
        o the least significant byte for minor revisions

  * units -- one byte: Units for the X and Y densities
        o 0 => no units, X and Y specify the pixel aspect ratio
        o 1 => X and Y are dots per inch
        o 2 => X and Y are dots per cm
  * Xdensity -- two bytes
  * Ydensity -- two bytes
  * Xthumbnail -- one byte: 0 = no thumbnail
  * Ythumbnail -- one byte: 0 = no thumbnail
  * (RGB)n -- 3n bytes: packed (24-bit) RGB values for the thumbnail pixels, n = Xthumbnail *
     Ythumbnail
The bold words in the above header is of importance to us. The 4 byte value consisting of SOI and JFIF marker. This signifies the starting of the jpg image. Any standard image viewer searches the file for "d8ff e0ff" (little endian mode) pattern. Once this of found, marks the start of the jpg image. The end of the jpg image is marked with "0xd9ff" (little endian mode). A cat on the image is going to make sure that some data is written after 0xd9ff there by making it unnecessary for any image viewer to bother about data after 0xd9ff.
Lets look at the zip header format.
Overall .ZIP file format:
[local file header 1]
[file data 1]
[data descriptor 1]
.
.
.
[local file header n]
[file data n]
[data descriptor n]
[archive decryption header]
[archive extra data record]
[central directory]
[zip64 end of central directory record]
[zip64 end of central directory locator]
[end of central directory record]
The one that concerns us is local file header
Local file header:

local file header signature 4 bytes (0x04034b50)
version needed to extract 2 bytes
general purpose bit flag 2 bytes
compression method 2 bytes
last mod file time 2 bytes
last mod file date 2 bytes
crc-32 4 bytes
compressed size 4 bytes
uncompressed size 4 bytes
file name length 2 bytes
extra field length 2 bytes

file name (variable size)
extra field (variable size)
As seen in the bold letters is the signature of the start of the zip file. So the unzip program tries to find the above pattern in the file and assumes that the rest of the file till "end of central dir record" is reached. This explains why tar.gz or tar.bz2 files don't work while zip does. In other words, the gz/bz2 formats look for starting 4 bytes as identifiers and if not found will quit immediately.
The following example will illustrate the file layout of the various file formats.
Example: Generated using hexdump
Image file (jpg):
0000000 d8ff e0ff 1000 464a 4649 0100 0001 0100
0000010 0100 0000 dbff 8400 1000 0c0b 0c0e 100a
.
.
0005b50 4792 d9ff
0005b54
As discussed, the hex value in bold indicates the start of the jpg file. Now lets look at the zip file.
Zip file (.zip):
0000000 4b50 0403 0014 0000 0008 776b 3a41 d8d9
0000010 00d8 1109 000c 2c00 000d 0009 0015 6f77
.
.
00c1190 0100 0100 4400 0000 4500 0c11 0000 0000
00c119f
After the concatenation, the file now consists of both jpg and zip content as shown below.
Embedded Image File (jpg):
0000000 d8ff e0ff 1000 464a 4649 0100 0001 0100
0000010 0100 0000 dbff 8400 1000 0c0b 0c0e 100a
.
.
.
0005b50 4792 d9ff 4b50 0403 0014 0000 0008 776b
0005b60 3a41 d8d9 00d8 1109 000c 2c00 000d 0009
.
.
00c6ce0 0006 0000 0100 0100 4400 0000 4500 0c11
00c6cf0 0000 0000
00c6cf3
This little example must be able to clear out the doubts of how this works. Next step would be to manipulate the hex file to make zip program believe that jpg data is the zipped data. Stay tuned for more on this.
Monday, February 2, 2009
Hiding Zipped Files Under Jpg Images
Sometimes we come across situations when we have to hide certain files. There are many methods in which this can be accomplished. This is one of the many ways to do so. This applies to only zip file contents.
Step 1: Zip the file/folder to be hidden
Lets assume that abc.jpg is the image we are using for the camouflage.
Step 2: Hide the zipped contents
The new.jpg will be jpg file that hides the zipped content. The file will have meta data as jpg and any image viewer will be able to open it.
To extract the hidden contents:
Vola!! Thats it. Its as simple as it is! Thanks to Naveed for this tip.
Step 1: Zip the file/folder to be hidden
#zip xyz.ppt.zip xyz.ppt
Lets assume that abc.jpg is the image we are using for the camouflage.
Step 2: Hide the zipped contents
#cat abc.jpg xyz.ppt.zip > new.jpg
The new.jpg will be jpg file that hides the zipped content. The file will have meta data as jpg and any image viewer will be able to open it.
To extract the hidden contents:
#unzip new.jpg
Vola!! Thats it. Its as simple as it is! Thanks to Naveed for this tip.
Wednesday, January 28, 2009
Sample Code To Learn Netlink Infrastructure
I always wanted to write an article explaining how netlink infrastructure works in the kernel and how we can make the best use of it. I dont have the time now, so in future it will happen. As of now i wanted to share a sample code that will help users get the system ip information to the user space.
#include <errno.h>
#include <error.h>
#include <netdb.h>
#include <stdio.h>
#include <stdlib.h>
#include <string.h>
#include <unistd.h>
#include <netinet/in.h>
#include <sys/socket.h>
#include <sys/ioctl.h>
#include <linux/if.h>
#include <linux/netlink.h>
#include <linux/rtnetlink.h>


#define NIPQUAD(addr) \
        ((unsigned char *)&addr)[0], \
        ((unsigned char *)&addr)[1], \
        ((unsigned char *)&addr)[2], \
        ((unsigned char *)&addr)[3]

#define NIPQUAD_FMT "%u.%u.%u.%u"

#define NIP6(addr) \
        ntohs((addr).s6_addr16[0]), \
        ntohs((addr).s6_addr16[1]), \
        ntohs((addr).s6_addr16[2]), \
        ntohs((addr).s6_addr16[3]), \
        ntohs((addr).s6_addr16[4]), \
        ntohs((addr).s6_addr16[5]), \
        ntohs((addr).s6_addr16[6]), \
        ntohs((addr).s6_addr16[7])

#define NIP6_FMT "%04x:%04x:%04x:%04x:%04x:%04x:%04x:%04x"

#define INFINITY_LIFE_TIME      0xFFFFFFFFU

main()

{
      struct {
              struct nlmsghdr n;
              struct ifaddrmsg r;
//              char             buf[1024];
      } req;

      struct rtattr *rta;
      struct sockaddr_in6 *sin6p;
      struct sockaddr_in *sinp;
      int status;
      char buf[16384];
      struct nlmsghdr *nlmp;
      struct ifaddrmsg *rtmp;
      struct rtattr *rtatp;
      int rtattrlen;
      struct in_addr *inp;
      struct in6_addr *in6p;
      struct ifa_cacheinfo *cache_info;

      int fd = socket(PF_NETLINK, SOCK_DGRAM, NETLINK_ROUTE);

      /* We use RTM_GETADDR to fetch the ip address from the kernel interface table *
         * So what we do here is pretty simple, we populate the msg structure (req)   *
         * the size of the message buffer is specified to netlink message header, and *
         * flags values are set as NLM_F_ROOT | NLM_F_REQUEST. The request flag must  *
         * be set for all messages requesting the data from kernel. The root flag is  *
         * used to notify the kernel to return the full tabel. Another flag (not used)*
         * is NLM_F_MATCH. This is used to get only speficed entried in the table.    *
         * At the time of writing this program this flag is not implemented in kernel */

      memset(&req, 0, sizeof(req));
      req.n.nlmsg_len = NLMSG_LENGTH(sizeof(struct ifaddrmsg));
      req.n.nlmsg_flags = NLM_F_REQUEST | NLM_F_ROOT;
      req.n.nlmsg_type = RTM_GETADDR;


      /* AF_INET6 is used to signify the kernel to fetch only ipv6 entires.         *
        * Replacing this with AF_INET will fetch ipv4 address table.                 */

      req.r.ifa_family = AF_INET6;

      /* Fill up all the attributes for the rtnetlink header. The code is pretty easy*
        * to understand. The lenght is very important. We use 16 to signify the ipv6  *
       * address. If the user chooses to use AF_INET (ipv4) the length has to be     *
        * RTA_LENGTH(4) */

      rta = (struct rtattr *)(((char *)&req) + NLMSG_ALIGN(req.n.nlmsg_len));
      rta->rta_len = RTA_LENGTH(16);

      /* Time to send and recv the message from kernel */

      status = send(fd, &req, req.n.nlmsg_len, 0);

      if (status < 0) {
              perror("send");
              return 1;
      }

      status = recv(fd, buf, sizeof(buf), 0);

      if (status < 0) {
              perror("recv");
              return 1;
      }

      if(status == 0){
              printf("EOF\n");
              return 1;
      }

      /* Typically the message is stored in buf, so we need to parse the message to *
        * get the required data for our display. */

      for(nlmp = (struct nlmsghdr *)buf; status > sizeof(*nlmp);){
              int len = nlmp->nlmsg_len;
              int req_len = len - sizeof(*nlmp);

              if (req_len<0 || len>status) {
                      printf("error\n");
                      return -1;
              }

              if (!NLMSG_OK(nlmp, status)) {
                      printf("NLMSG not OK\n");
                      return 1;
              }

              rtmp = (struct ifaddrmsg *)NLMSG_DATA(nlmp);
              rtatp = (struct rtattr *)IFA_RTA(rtmp);

              /* Start displaying the index of the interface */

              printf("Index Of Iface= %d\n",rtmp->ifa_index);

              rtattrlen = IFA_PAYLOAD(nlmp);

              for (; RTA_OK(rtatp, rtattrlen); rtatp = RTA_NEXT(rtatp, rtattrlen)) {

               /* Here we hit the fist chunk of the message. Time to validate the    *
                 * the type. For more info on the different types see man(7) rtnetlink*
                 * The table below is taken from man pages.                           *
                 * Attributes                                                         *
                 * rta_type        value type             description                 *
                 * -------------------------------------------------------------      *
                 * IFA_UNSPEC      -                      unspecified.                *
                 * IFA_ADDRESS     raw protocol address   interface address           *
                 * IFA_LOCAL       raw protocol address   local address               *
                 * IFA_LABEL       asciiz string          name of the interface       *
                 * IFA_BROADCAST   raw protocol address   broadcast address.          *
                 * IFA_ANYCAST     raw protocol address   anycast address             *
                 * IFA_CACHEINFO   struct ifa_cacheinfo   Address information.        */

                      if(rtatp->rta_type == IFA_CACHEINFO){
                              cache_info = (struct ifa_cacheinfo *)RTA_DATA(rtatp);
                              if (cache_info->ifa_valid == INFINITY_LIFE_TIME)
                                      printf("valid_lft forever\n");
                              else
                                      printf("valid_lft %usec\n", cache_info->ifa_valid);

                              if (cache_info->ifa_prefered == INFINITY_LIFE_TIME)
                                      printf(" preferred_lft forever\n");
                              else
                                      printf(" preferred_lft %usec\n",cache_info->ifa_prefered);
                      }

                      /* NOTE: All the commented code below can be used as it is for ipv4 table */

                      if(rtatp->rta_type == IFA_ADDRESS){
                              // inp = (struct in_addr *)RTA_DATA(rtatp);
                              in6p = (struct in6_addr *)RTA_DATA(rtatp);
                              printf("addr0: " NIP6_FMT "\n",NIP6(*in6p));
                              // printf("addr0: "NIPQUAD_FMT"\n",NIPQUAD(*inp));
                      }

                      if(rtatp->rta_type == IFA_LOCAL){
                              // inp = (struct in_addr *)RTA_DATA(rtatp);
                              in6p = (struct in6_addr *)RTA_DATA(rtatp);
                              printf("addr1: " NIP6_FMT "\n",NIP6(*in6p));
                              // printf("addr1: "NIPQUAD_FMT"\n",NIPQUAD(*inp));
                      }

                      if(rtatp->rta_type == IFA_BROADCAST){
                              // inp = (struct in_addr *)RTA_DATA(rtatp);
                              in6p = (struct in6_addr *)RTA_DATA(rtatp);
                              printf("bcataddr: " NIP6_FMT "\n",NIP6(*in6p));
                              // printf("Bcast addr: "NIPQUAD_FMT"\n",NIPQUAD(*inp));
                      }

                      if(rtatp->rta_type == IFA_ANYCAST){
                             //inp = (struct in_addr *)RTA_DATA(rtatp);
                             in6p = (struct in6_addr *)RTA_DATA(rtatp);
                             printf("anycastaddr: "NIP6_FMT"\n",NIP6(*in6p));
                            // printf("anycast addr: "NIPQUAD_FMT"\n",NIPQUAD(*inp));
                      }

              }
              status -= NLMSG_ALIGN(len);
              nlmp = (struct nlmsghdr*)((char*)nlmp + NLMSG_ALIGN(len));

      }

}
Subscribe to:
Posts (Atom)


