Here is a quick way to create desktop shortcuts for kde 4.2.
/usr/share/applications/ and /usr/share/applications/kde4 contains all the shortcut files (*.desktop).
Just copy what ever you want to ~/Desktop. Thats it!
Thursday, April 30, 2009

Tuesday, April 28, 2009
fsck.ext3 Unable to resolve UUID error
I installed Kubuntu 9.04 recently and within a day i ran into a peculiar problem. When i boot my system an error message "fsck.ext3 Unable to resolve UUID=". This error generally happens when there is some information mismatch between what is specified in /etc/fstab and what information the OS gives to fsck utility. In this case, its quite easy to solve the problem.
Enter the root password to enter the Maintenance mode when asked during boot.
(Control - D to continue):
List the partition table of your system.
#fdisk -l
Device Boot Start End Blocks Id System
/dev/sda1 * 1 1913 15361888+ 83 Linux
Partition 1 does not end on cylinder boundary.
/dev/sda2 1914 3186 10225372+ 83 Linux
/dev/sda3 3187 12161 72091687+ 5 Extended
/dev/sda5 3187 9265 48829536 83 Linux
/dev/sda6 9266 11697 19535008+ 83 Linux
/dev/sda7 11698 12161 3727048+ 82 Linux swap / Solaris
#vim /etc/fstab
Verify that each device entry specified in the file matches the correct file-system.This error can occur if FS type is wrongly specified. For example, /dev/sda7 is shown as ext3 FS when it clearly a swap in the above case. Correct such errors and reboot. This should solve the problem.
If the entries are correct then, possible problem lies in the UUID specified in fstab. To solve this problem
Determine the UUID of each and every device mentioned in fstab. This exmaple shows for sda1. Repeat this for all devices.
#vol_id -u /dev/sda1
b056f084-eb83-4374-9635-0b5904ff520a
A line taken from my fstab
# /virt was on /dev/sda1 during installation
UUID=b056f084-eb83-4374-9635-0b5904ff520a /virt ext3 relatime 02
Note that UUID matches the entry in fstab. If there is a mismatch, then the entry shown by fstab must be replaced by vol_id. Thats it! save and reboot. This will solve the problem.
REASON: The problem was solved but i was not sure what caused this problem. On further analysis i was able to narrow down on what caused the issue. Apparently, i did a format of a partition (/dev/sda1) which is NOT the / partition using gpartd. Gpart does not allow formats on mounted partitions, so the tools unmounts the partition and formats it. During this step, udev recognizes the new formated device as a new device and old one being removed(formated). Hence it assigned a new UUID which is now not same the one specified in /etc/fstab. Thats why on reboot i ran into this issue.
Enter the root password to enter the Maintenance mode when asked during boot.
(Control - D to continue):
List the partition table of your system.
#fdisk -l
Device Boot Start End Blocks Id System
/dev/sda1 * 1 1913 15361888+ 83 Linux
Partition 1 does not end on cylinder boundary.
/dev/sda2 1914 3186 10225372+ 83 Linux
/dev/sda3 3187 12161 72091687+ 5 Extended
/dev/sda5 3187 9265 48829536 83 Linux
/dev/sda6 9266 11697 19535008+ 83 Linux
/dev/sda7 11698 12161 3727048+ 82 Linux swap / Solaris
#vim /etc/fstab
Verify that each device entry specified in the file matches the correct file-system.This error can occur if FS type is wrongly specified. For example, /dev/sda7 is shown as ext3 FS when it clearly a swap in the above case. Correct such errors and reboot. This should solve the problem.
If the entries are correct then, possible problem lies in the UUID specified in fstab. To solve this problem
Determine the UUID of each and every device mentioned in fstab. This exmaple shows for sda1. Repeat this for all devices.
#vol_id -u /dev/sda1
b056f084-eb83-4374-9635-0b5904ff520a
A line taken from my fstab
# /virt was on /dev/sda1 during installation
UUID=b056f084-eb83-4374-9635-0b5904ff520a /virt ext3 relatime 02
Note that UUID matches the entry in fstab. If there is a mismatch, then the entry shown by fstab must be replaced by vol_id. Thats it! save and reboot. This will solve the problem.
REASON: The problem was solved but i was not sure what caused this problem. On further analysis i was able to narrow down on what caused the issue. Apparently, i did a format of a partition (/dev/sda1) which is NOT the / partition using gpartd. Gpart does not allow formats on mounted partitions, so the tools unmounts the partition and formats it. During this step, udev recognizes the new formated device as a new device and old one being removed(formated). Hence it assigned a new UUID which is now not same the one specified in /etc/fstab. Thats why on reboot i ran into this issue.
Change/Resassign Interface Name In Linux
Depending on the linux distro, the interface name given to network cards differ.
For example, on one distro Intel Giga bit Ethernet card might be detected as eth0 and Broadcom card as eth1 while with another distro this might be reversed. This causes a lot of problem, when one uses automated scripts which hardcode "eth0" and "eth1". In older distros it was matter of changing few network scripts to get this working. One can also use "ip" command to make this change temporarily. But to make it permanent it needs to be changed in udev. Here is how simple it is to change the ethernet names.
NOTE: This is only tested on F-10 and Ubuntu 9.04. Its expected to be the same for other distros. Only the name of the udev script might change.
Edit the rule script:
#vim /etc /udev/rules.d/70-persistent-net.rules
Here the list of n/w adapters and their names are specified!
Change the field NAME="eth0" to NAME="eth1" or vice versa
Remember to rename the other adapter whose name you have borrowed.
Restart the system and you will find the new names interchanged!
For example, on one distro Intel Giga bit Ethernet card might be detected as eth0 and Broadcom card as eth1 while with another distro this might be reversed. This causes a lot of problem, when one uses automated scripts which hardcode "eth0" and "eth1". In older distros it was matter of changing few network scripts to get this working. One can also use "ip" command to make this change temporarily. But to make it permanent it needs to be changed in udev. Here is how simple it is to change the ethernet names.
NOTE: This is only tested on F-10 and Ubuntu 9.04. Its expected to be the same for other distros. Only the name of the udev script might change.
Edit the rule script:
#vim /etc /udev/rules.d/70-persistent-net.rules
Here the list of n/w adapters and their names are specified!
Change the field NAME="eth0" to NAME="eth1" or vice versa
Remember to rename the other adapter whose name you have borrowed.
Restart the system and you will find the new names interchanged!
Friday, March 13, 2009
Sametime on Koepete
Last year cheezo had blogged about getting pidgin to support sametime protocol. It was great, but as KDE guy i missed it on Kopete. Its only recently i got myself to try it & viola it worked with just a little effort. I have the latest versions of these packages on my KDE 4.2.1 intrepid box (yes i live the bleeding edge tech, but any version of KDE 4.1.x which supports kdenetwork - 4:4.1.80-0ubuntu1 should do the job).
- kopete 4:4.2.1-0ubuntu1~intrepid1
- libmeanwhile1 1.0.2-3+ocdc3+intrepid (I got it from ocdc repo, libmeanwhile is also there in ubuntu multiverse)
- kopete-meanwhile 0.1-0ubuntu2, (optional, can be downloaded from here.)
With the above all installed you should see the "Meanwhile" as one of the options in the _messaging services_ list in Kopete. Add a new account & continue with the username & password in the pretty straightforward _Basic Setup_ tab. The only tweaking required was the "Client Identifier" info in the _Connections_ tab. Use the option & no.s in the shot below.
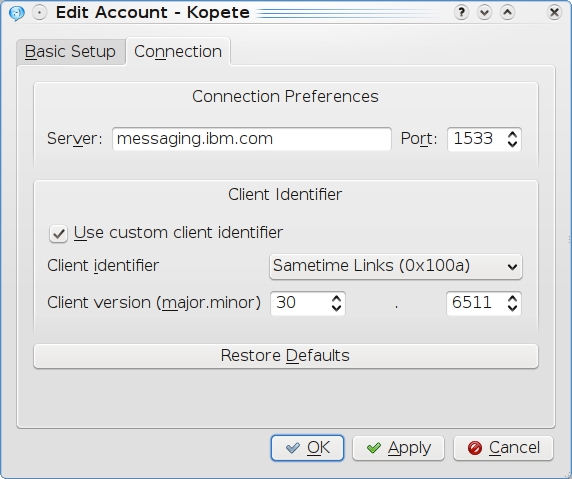
With that you should be good to go.
--
Enjoy
- kopete 4:4.2.1-0ubuntu1~intrepid1
- libmeanwhile1 1.0.2-3+ocdc3+intrepid (I got it from ocdc repo, libmeanwhile is also there in ubuntu multiverse)
- kopete-meanwhile 0.1-0ubuntu2, (optional, can be downloaded from here.)
With the above all installed you should see the "Meanwhile" as one of the options in the _messaging services_ list in Kopete. Add a new account & continue with the username & password in the pretty straightforward _Basic Setup_ tab. The only tweaking required was the "Client Identifier" info in the _Connections_ tab. Use the option & no.s in the shot below.
With that you should be good to go.
--
Enjoy
Tuesday, February 24, 2009
Why linux keeps connected routes when link goes down?
I came across this interesting discussion on a particular behavior of linux. This issues was brought up by a system administrator who was facing an interesting situation. When the link of an interface goes down possibly due to hardware failure or cable pull out, the ip address and routes associated with that interface is retained until someone explicitly deletes it. This behavior is built into linux for more than 10 years and the reason for this was stated by David Miller.
The default behavior for a general purpose operating system isIt becomes clear why the developers decided to go with associating ip address with a particular node rather than an interface in the node. The problem with this implementation is relevant when linux is being used as a router. A router is a multi-homed host and tends to have multiple interfaces each connected to different network. So if a situation arises where the router finds a route entry to send a particular packet there are chances that the link may be down and packet never reaches the destination. Even if there are alternated routes to reach the particular destination it cannot be used as there is already an existing valid route with a interface that is down. Lennart Sorensen argued against David Miller's claim that different interface of the router might be connected to same network in which case the alternate interface can be taken. According to Lennart it still useless as we would end up having 2 route entries to the same destination with different interfaces and would pose the same problem when the first route entry points to an interface which is down. The no conclusion to this little problem as David points out in his replay to Lennart.
to increase the likelyhood of successful communication.
And the way to maximize successful communication is to associate
addresses with the host rather than the interface.
This decision was made at least 10 years ago, and if you think what weAll is not lost in this regard for people using linux as router. Stephen Hemminger suggested using quagga for this purpose. There are patches submitted to the quagga mailing list which does what Lennart wants without any modification to the kernel behaviour. Unfortunately those patches are not yet upstream in the quagga branch and has to be applied as patch. So in future would quagga become the routing management daemon for linux? Thats something we need to watch out.
have now is broken just imagine how much struff would explode if we
changed things.
Tuesday, February 3, 2009
Theory Behind Hiding Zipped File Under Jpg Image
The post Hiding Zipped File Under Jpg Image showed the steps to achieve data hiding in jpg. Since Ego was questioning the theory behind this, i decided to get my hands dirty and find the answer. To understand this, we need to understand the data structures of jpg image and zip files.
Lets bisect the jpg image first.
Jpg Header Format:
The bold words in the above header is of importance to us. The 4 byte value consisting of SOI and JFIF marker. This signifies the starting of the jpg image. Any standard image viewer searches the file for "d8ff e0ff" (little endian mode) pattern. Once this of found, marks the start of the jpg image. The end of the jpg image is marked with "0xd9ff" (little endian mode). A cat on the image is going to make sure that some data is written after 0xd9ff there by making it unnecessary for any image viewer to bother about data after 0xd9ff.
Lets look at the zip header format.
Overall .ZIP file format:
The one that concerns us is local file header
As seen in the bold letters is the signature of the start of the zip file. So the unzip program tries to find the above pattern in the file and assumes that the rest of the file till "end of central dir record" is reached. This explains why tar.gz or tar.bz2 files don't work while zip does. In other words, the gz/bz2 formats look for starting 4 bytes as identifiers and if not found will quit immediately.
The following example will illustrate the file layout of the various file formats.
Example: Generated using hexdump
Image file (jpg):
As discussed, the hex value in bold indicates the start of the jpg file. Now lets look at the zip file.
Zip file (.zip):
After the concatenation, the file now consists of both jpg and zip content as shown below.
Embedded Image File (jpg):
This little example must be able to clear out the doubts of how this works. Next step would be to manipulate the hex file to make zip program believe that jpg data is the zipped data. Stay tuned for more on this.
Lets bisect the jpg image first.
Jpg Header Format:
Start of Image (SOI) marker -- two bytes (FFD8)
JFIF marker (FFE0)

  * length -- two bytes
  * identifier -- five bytes: 4A, 46, 49, 46, 00 (the ASCII code equivalent of a zero terminated "JFIF" string)
  * version -- two bytes: often 01, 02
        o the most significant byte is used for major revisions
        o the least significant byte for minor revisions

  * units -- one byte: Units for the X and Y densities
        o 0 => no units, X and Y specify the pixel aspect ratio
        o 1 => X and Y are dots per inch
        o 2 => X and Y are dots per cm
  * Xdensity -- two bytes
  * Ydensity -- two bytes
  * Xthumbnail -- one byte: 0 = no thumbnail
  * Ythumbnail -- one byte: 0 = no thumbnail
  * (RGB)n -- 3n bytes: packed (24-bit) RGB values for the thumbnail pixels, n = Xthumbnail *
     Ythumbnail
The bold words in the above header is of importance to us. The 4 byte value consisting of SOI and JFIF marker. This signifies the starting of the jpg image. Any standard image viewer searches the file for "d8ff e0ff" (little endian mode) pattern. Once this of found, marks the start of the jpg image. The end of the jpg image is marked with "0xd9ff" (little endian mode). A cat on the image is going to make sure that some data is written after 0xd9ff there by making it unnecessary for any image viewer to bother about data after 0xd9ff.
Lets look at the zip header format.
Overall .ZIP file format:
[local file header 1]
[file data 1]
[data descriptor 1]
.
.
.
[local file header n]
[file data n]
[data descriptor n]
[archive decryption header]
[archive extra data record]
[central directory]
[zip64 end of central directory record]
[zip64 end of central directory locator]
[end of central directory record]
The one that concerns us is local file header
Local file header:

local file header signature 4 bytes (0x04034b50)
version needed to extract 2 bytes
general purpose bit flag 2 bytes
compression method 2 bytes
last mod file time 2 bytes
last mod file date 2 bytes
crc-32 4 bytes
compressed size 4 bytes
uncompressed size 4 bytes
file name length 2 bytes
extra field length 2 bytes

file name (variable size)
extra field (variable size)
As seen in the bold letters is the signature of the start of the zip file. So the unzip program tries to find the above pattern in the file and assumes that the rest of the file till "end of central dir record" is reached. This explains why tar.gz or tar.bz2 files don't work while zip does. In other words, the gz/bz2 formats look for starting 4 bytes as identifiers and if not found will quit immediately.
The following example will illustrate the file layout of the various file formats.
Example: Generated using hexdump
Image file (jpg):
0000000 d8ff e0ff 1000 464a 4649 0100 0001 0100
0000010 0100 0000 dbff 8400 1000 0c0b 0c0e 100a
.
.
0005b50 4792 d9ff
0005b54
As discussed, the hex value in bold indicates the start of the jpg file. Now lets look at the zip file.
Zip file (.zip):
0000000 4b50 0403 0014 0000 0008 776b 3a41 d8d9
0000010 00d8 1109 000c 2c00 000d 0009 0015 6f77
.
.
00c1190 0100 0100 4400 0000 4500 0c11 0000 0000
00c119f
After the concatenation, the file now consists of both jpg and zip content as shown below.
Embedded Image File (jpg):
0000000 d8ff e0ff 1000 464a 4649 0100 0001 0100
0000010 0100 0000 dbff 8400 1000 0c0b 0c0e 100a
.
.
.
0005b50 4792 d9ff 4b50 0403 0014 0000 0008 776b
0005b60 3a41 d8d9 00d8 1109 000c 2c00 000d 0009
.
.
00c6ce0 0006 0000 0100 0100 4400 0000 4500 0c11
00c6cf0 0000 0000
00c6cf3
This little example must be able to clear out the doubts of how this works. Next step would be to manipulate the hex file to make zip program believe that jpg data is the zipped data. Stay tuned for more on this.
Monday, February 2, 2009
Hiding Zipped Files Under Jpg Images
Sometimes we come across situations when we have to hide certain files. There are many methods in which this can be accomplished. This is one of the many ways to do so. This applies to only zip file contents.
Step 1: Zip the file/folder to be hidden
Lets assume that abc.jpg is the image we are using for the camouflage.
Step 2: Hide the zipped contents
The new.jpg will be jpg file that hides the zipped content. The file will have meta data as jpg and any image viewer will be able to open it.
To extract the hidden contents:
Vola!! Thats it. Its as simple as it is! Thanks to Naveed for this tip.
Step 1: Zip the file/folder to be hidden
#zip xyz.ppt.zip xyz.ppt
Lets assume that abc.jpg is the image we are using for the camouflage.
Step 2: Hide the zipped contents
#cat abc.jpg xyz.ppt.zip > new.jpg
The new.jpg will be jpg file that hides the zipped content. The file will have meta data as jpg and any image viewer will be able to open it.
To extract the hidden contents:
#unzip new.jpg
Vola!! Thats it. Its as simple as it is! Thanks to Naveed for this tip.
Subscribe to:
Posts (Atom)


