I hope this tutorial will be able to help get the setup ready and working.
Stuff Iam Using:
- kvm (kernel virtual machine) or qumu with kqemu
- latest git kernel (2.6.25)
- fedora 8
#grep '(vmx|svm)' /proc/cpuinfo
flags : fpu vme de pse tsc msr pae mce cx8 apic sep mtrr pge mca cmov pat clflush dts acpi mmx fxsr sse sse2 ss ht tm pbe nx constant_tsc arch_perfmon bts pni monitor vmx est tm2 xtpr
flags : fpu vme de pse tsc msr pae mce cx8 apic sep mtrr pge mca cmov pat clflush dts acpi mmx fxsr sse sse2 ss ht tm pbe nx constant_tsc arch_perfmon bts pni monitor vmx est tm2 xtpr
If nothing is printed then you are out of luck. You dont have hardware based virtualization.
Dont worry mate, you can always use software based emulation (qemu, kqemu). If you are using ubuntu, its as simple as doing a 'sudo apt-get install qemu kqemu'.
The kgdb support has been added to 2.6.25 onwards, so iam using the git tree. You can download vanilla kernel from kernel.org or if you want to test on older kernel you need to apply appropriate patch from kgdb website as stated above. I will not be explaining this as its already available in their website.
The first step will be to create a new vm image (guest). There are mulitiple way to do it. There are pre built FS images available on the internet that can be downloaded. I prefer to create one on my own. I have decided to install fedora 8 as my guest os using kvm. This blog explains how to do this. Since its pretty straightforward i shall not explain this any further. I have just put in steps i used to install.
Create a 5GB iamge for my new OS
#qemu-img create f8.img -f qcow2 5G
Install the new OS (qemu users can simply replace "kvm" with "qemu" in the below command)
#kvm -m 512 -cdrom /home/temp/Fedora-8-i386-DVD.iso -boot d f8.img
This will take you through the regular distro installation procedure. At this point i was faced with need to resize my image. 5GB was not enough for me. This is illustrated here .
Boot the new guest os
#kvm -no-acpi -m 500 f8.img
Done. we have a virtual OS ready.
Few Optional Steps:
These are few optional steps needed to enable networking on guest OS. Ideally to copy some files into the guest image of fedora we need to mount it. Here is the procedure for the same. If the image is of the format vmdk (vmware format) then follow this . I prefer using networking to copy data in and out of the vm image rather than mounting. The below steps will help you boot your guest os with network support. For this you need to install "vtun" package using apt-get. Then start it using 'sudo /etc/init.d/vtun start'.
Give appropriate permission. Its observed that udev alters these permission. So you need to either fix udev rules or set this permission every time.
#chmod a+rw /dev/net/tun
The rest of the procedure is beautifully described here . I just made few alterations to the script to make it work in my environment.
#!/bin/bashThis modified script should take care of all the problems. As a root user execute the script.
# id of the user running qemu (kvm).Make sure you change it appropriately.
USERID=1002
# number of TUN/TAP devices to setup
NUM_OF_DEVICES=1
case $1 in
start)
modprobe tun
/etc/init.d/vtun start
chmod a+rw /dev/net/tun
echo -n "Setting up bridge device br0"
brctl addbr br0
ifconfig br0 192.168.1.1 netmask 255.255.255.0 up
for ((i=0; i < NUM_OF_DEVICES ; i++)); do
echo -n "Setting up "
tunctl -b -u $USERID -t qtap$i
brctl addif br0 qtap$i
ifconfig qtap$i up 0.0.0.0 promisc
done
;;
stop)
for ((i=0; i < NUM_OF_DEVICES ; i++)); do
ifconfig qtap$i down
brctl delif br0 qtap$i
tunctl -d qtap$i
done
ifconfig br0 down
brctl delbr br0
/etc/init.d/vtun stop
;;
*)
echo "Usage: $(basename $0) (start|stop)"
;;
esac
Note :Dont forget to specify the iptables rules as given in the above howto.
Now boot you guest os using:
#kvm -no-acpi -m 500 f8.img -net nic,model=rtl8139,macaddr=52:54:00:12:34:56 -net tap,ifname=qtap0,script=no
Once you guest it up, configure you network adapter to 192.168.1.x network.
#ifconfig eth0 192.168.1.2/24
#route add default gw 192.168.1.1 eth0
ping between two system to make sure its working. Thats it.
Download the latest kernel (>= 2.6.25) untar the file and do 'make menuconfig'
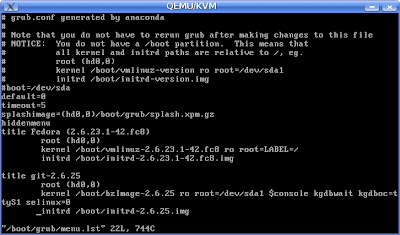
enable kernel hacking -> KGDB: kernel debugging with remote gdb and few additional kgdb options if required. Save and exit. Compile the new kernel and copy the bzImage and initrd.img to /boot of the guest os (fedora 8). Also copy the /lib/modules/2.6.25/ dir to the guest os using scp. Add a new entry in the /boot/grub/menu.lst of the guest os (fedora 8). Shown below is my menu.lst

The Important things to be noted is the additional arguments added to the kernel parameters.
$console kgdbwait kgdboc=ttyS1 selinux=0. These parameters will make the booting wait for gdb remote connection.
Poweroff the guest os and start again using the following options
#kvm -no-acpi -m 500 f8.img -net nic,model=rtl8139,macaddr=52:54:00:12:34:56 -net tap,ifname=qtap0,script=no $debug_args $vga_args -serial "stdio" -serial "pty"
At the time of booting this will give you the tty to which we are connected to. In my case
char device redirected to /dev/pts/5
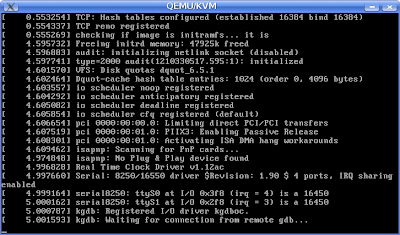
The system boots and waits for remote connection as shown below.

As shown above the kernel booting stops at waiting for remote gdb.......
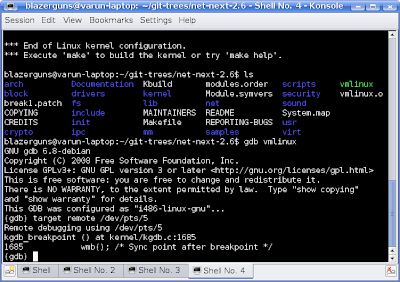
Navigate to the place where you have compiled the kernel sources in your host system and you will find a file "vmlinux" in that directory.
Do the following from a terminal in the host system
#gdb vmlinux
#target remote /dev/pts/5 --> Note: /dev/pts/5 is specific to me. In your case you would have to change your settings as per what is displayed after executing "#kvm -no-acpi ..... "as show before.

Done!!! Your are the gdb promt!!! Was'nt it easy? Happy debugging :-) .


